Migrating from v1 to v2
The latest Web SDK has evolved significantly from the previous release SDK v1. This guide describes what is new in v2, what has changed from v1 and what you need to do to migrate to the latest Universal Checkout SDK v2.The latest version v2 of Universal Checkout Web SDK introduces a few breaking changes.
Universal Checkout v2 SDK is super efficient and simpler to integrate. Going forward, the prior Primer Checkout SDK v1.x.x will be no longer supported.
Key Highlights
For more details about the new features and to see specific code examples, refer to the other sections of this guide.Initializing Universal Checkout
In the new Primer Universal Checkout Web SDK, you’ll find that the boilerplate for initializing is reduced to just one line of code!/* v2 */
// To initialize Universal Checkout
const universalCheckout = await Primer.showUniversalCheckout(clientToken, options)
/* v1 */
const Primer = await loadPrimer()                   // If the package is loaded from npm
const primer = new Primer({ credentials: clientToken })
const checkout = await primer.checkout(options)
Initialize Vault Manager
In the v2 SDK, you can initialize the vault manager using the following function:/* v2 */
// to initialize Vault Manager
const vaultManager = await Primer.showVaultManager(clientToken, options)
Other Initialization Changes
The new Universal Checkout initialization makes integration much simpler and easier. As a result, developers are no longer required to construct the Primer object using new Primer() call. Instead, you need to use Primer.showUniversalCheckout() or Primer.showVaultManager().Another set of changes that you need to take into account is when the package is loaded from npm:
- The
loadPrimer() call is now removed from the latest SDK. When the user approaches checkout, if you need to preload Primer Universal Checkout SDK, use preloadPrimer() instead. Under the hood, loadPrimer() is automatically called by Primer.showUniversalCheckout() so you do not need to call loadPrimer() explicitly anymore.
- It is no longer required to import the CSS file anymore.
Primer.showUniversalCheckout() will automatically load it.
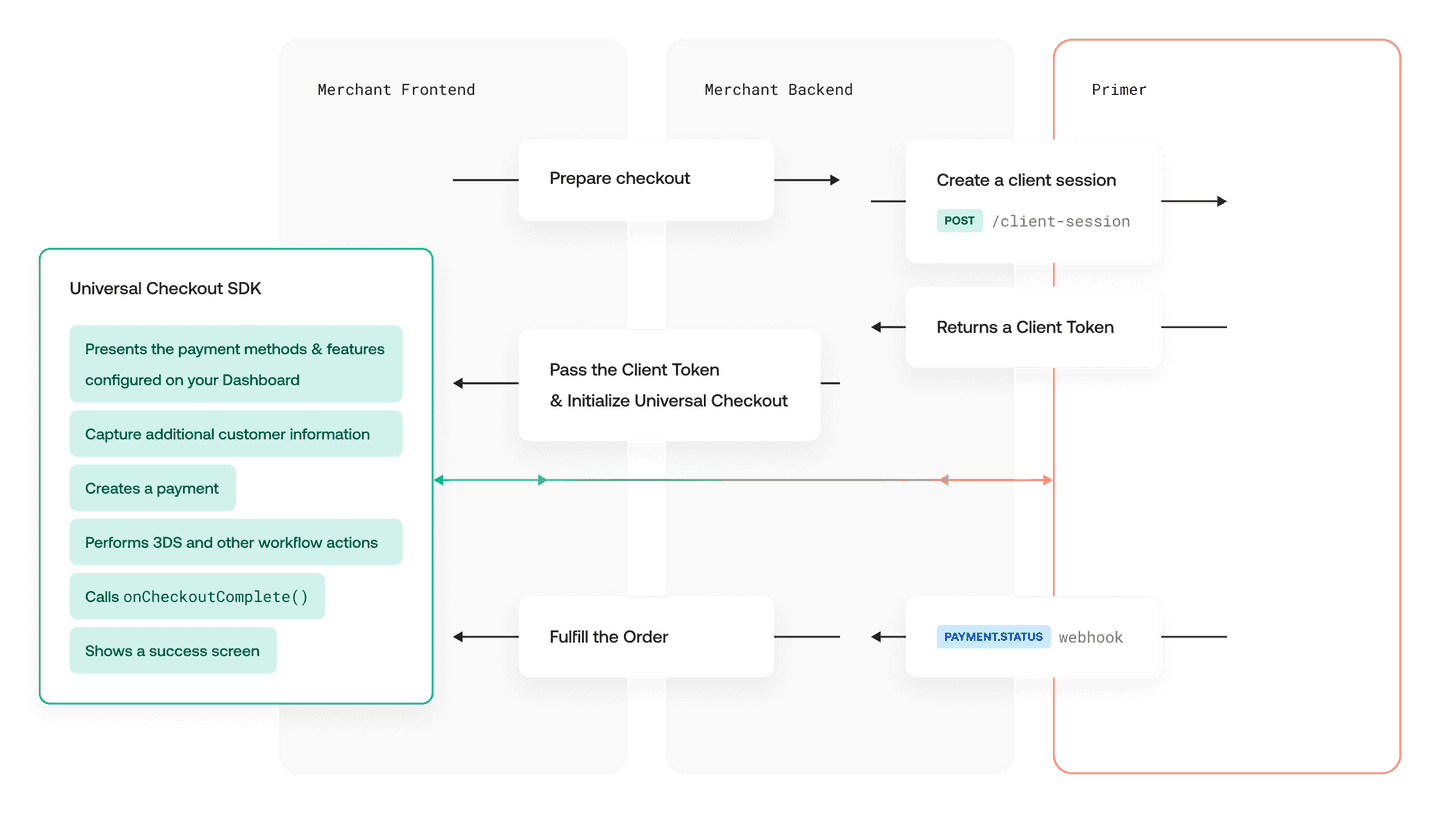
To find out more about Universal Checkout initialization process, checkout the Web Get Started Guide.Automatic Payment Creation
Universal Checkout Web SDK v2 now creates, resumes and handles payments under the hood 🎉The automatic payment flow is activated by default.When migrating to Web SDK v2, you need to use the following simpler code for payment creation:/* v2 */
Primer.showUniversalCheckout(token, {
onCheckoutComplete({ payment }) {
// e.g. Show a success message
},
})
/* v1 */
primer.checkout({
    onTokenizeSuccess(paymentMethodTokenData) {
        // Create a payment
        // If payment fails: show error message
        // If payment succeeds: show a success message
        // If payment has a required action: return the new client token
    },
    onResumeSuccess(resumeTokenData) {
        // Resume the payment
        // If payment fails: show error message
        // If payment succeeds: show a success message
        // If payment has a required action: return the new client token
    },
})
onTokenizeSuccess and onResumeSuccess. Not anymore.The functions onTokenizeSuccess and onResumeSuccess are no longer required to be used. This essentially means that you do not need to make any API calls for creating and resuming payments.Those can be edited out of your integration code.No complex integrations to maintain anymore!With the new SDK, you can simply listen to the PAYMENT.STATUS webhook and the callback onCheckoutComplete to process successful and even more secure payments as compared to the earlier versions.Should you wish to go back to the manual flow of v1, pass the option paymentHandling: "MANUAL". See Manual Payment Creation Guide for details./* v2 */
Primer.showUniversalCheckout({
paymentHandling: 'MANUAL',
onTokenizeSuccess(data, handler) {
// To implement
},
onResumeSuccess(data, handler) {
// To implement
},
/* Other options */
})
onTokenizeSuccess and onResumeSuccess change
In the earlier version, onTokenizeSuccess and onResumeSuccess had to return specific data to trigger various scenarios. This proved to be quite error-prone and not self-explanatory./* v2 */
async function onTokenizeSuccess(paymentMethodTokenData) {
return true; // Handle success
// or
throw new Error("Error message"); // Handle error message
// or
return { clientToken: "..." } // Continue the flow with a new client token
}
// Same for onResumeSuccess
handler argument that contains the functions to continue./* v2 */
async function onTokenizeSuccess(paymentMethodTokenData, handler) {
return handler.handleSuccess(); // Handle success
// or
return handler.handleFailure("Error message"); // Handle failure with a custom error message
// or
return handler.continueWithNewClientToken("..."); // Continue the flow with a new client token
}
async function onResumeSuccess(paymentMethodTokenData, handler) {
return handler.handleSuccess(); // Handle success
// or
return handler.handleFailure("Error message"); // Handle failure with a custom error message
// or
return handler.continueWithNewClientToken("..."); // Continue the flow with a new client token
}
Improved 3DS
In Web SDK v2 the threeDSecure option is now completely removed from the Universal Checkout. Earlier, this option was provided to trigger 3DS at the time of tokenization.
Payment Options Updates
The following payment method options in Primer Checkout SDK v1.x.x are no longer available in the latest Universal Checkout SDK v2. Developers must now specify the order and customer details when creating the client session with .| Earlier v1.x.x | Latest v2 SDK |
|---|
purchaseInfo and orderDetails (in the SDK) | Pass the order details through the client-session API call. |
customerDetails (in the SDK) | Pass the customer information through the client-session API call. |
customerId (in the SDK) | Specify the customerId through the client-session API call. |
countryCode (in the SDK) | Pass order.countryCode through the client-session API call. |
businessDetails (in the SDK) | Only needed for tax calculation using TaxJar. Removed. In the future, business details… |
Setters Removed
The Setters in Web SDK v1.x.x listed below have been removed. Now this information is retrieved by Universal Checkout through the client session.Developers need to migrate their integration backend to use the latest Universal Checkout SDK v2 and update order details using . The token obtained through the client-session API needs to be passed to the SDK with setClientToken(newClientToken) API call.| Earlier v1.x.x | Latest v2 SDK |
|---|
setPurchaseInfo and setOrderDetails (in the SDK) | Update the order in the client session, then call setClientToken(...). |
setCustomerDetails (in the SDK) | Update the customer in the client session, then call setClientToken(...). |
setBusinessDetails (in the SDK) | This has been completely removed |
const universalCheckout = await Primer.showUniversalCheckout(clientToken, options)

// Update client token
universalCheckout.setClientToken('...')
Once you migrate your merchant backend, all your implementations will be able to properly display payment methods through the Primer Universal Checkout, regardless of the platform!
allowedPaymentMethods Removed
In the previous Primer Checkout v1.x.x, the option allowedPaymentMethods was used to filter and display the payment methods as required by a specific merchant integration. This is no longer necessary and has been completely removed in the latest SDK v2.The recently introduced Checkout section in the Dashboard enables display of merchant-specific payment methods, based on the conditions defined by them.With Universal Checkout, Primer can now dynamically show payment methods in the user interface. It uses the conditions set up by you on the dashboard, along with the data passed in the client session call, to dynamically display only those payment methods that are applicable as per your selection and inputs.
Client Session Actions Automation
Earlier versions of Primer Checkout SDK required you to integrate using onClientSessionActions.Now, with the latest SDK v2, as the customer interacts with the UI, Universal Checkout takes care of setting up “client session actions” via onClientsessionActions().Developers are no longer required to call this function anymore and it has been removed from the SDK. Instead, now you need to set up the following callbacks:
onClientSessionUpdateonClientSessionUpdateStart
onClientSessionActions. These callbacks are now replaced by the client session update call.
onAmountChangeonAmountChangingonAmountChangeError
The previous SDK version had Primer Checkout functionality that was sending you Client session actions in order to enable you to update the client session according to the merchant checkout requirements. This is now completely managed automatically by the Primer Universal Web SDK v2.The latest SDK can now collect various customer data such as the billing address, customer contact details and update the client session by itself. It no longer requires any explicit developer initiated actions or function calls to update these details while integrating with Primer.
- The option
submitButton.visible is now renamed to submitButton.useBuiltInButton.
Styling Customization Changes
Earlier, the card input fields could be customized as per merchant checkout requirements using card.css.Now, you can instead use the style option to customize the style 🎨 for the entire Universal Checkout SDK and align with the merchant branding in a more cohesive and unified way!For more details, refer to the Primer Universal Checkout Web SDK Styling Guide.Miscellaneous Updates
-
Card holder name display option
The option
card.cardholderName.visible available in the previous version of Primer Checkout SDK has been removed altogether. You can continue to configure this setting through the Dashboard in the forthcoming release. Stay tuned!
In the meantime, if you need to show or hide the cardholder name field, please get in touch with us.
-
Renamed
CheckoutOptions
The TypeScript CheckoutOptions is now renamed to UniversalCheckoutOptions.
-
Checkout object updates
The checkout object functions
tokenize() and validate() are no longer available in Universal Checkout SDK v2.
Deprecated Items
- Checkout Components
Checkout Components are now sunset and no longer supported. The new Universal Checkout SDK does not contain the
primer.render() function. Make sure you clean that up!
At Primer, we are all working hard towards a fully customisable payment framework that enables you to build any checkout that you want!Stay tuned for more updates!
Migrating from v1 to v2
The latest Android SDK has evolved significantly from the previous release SDK v1. This guide describes what is new in v2, what has changed from v1 and what you need to do to migrate to the latest Universal Checkout SDK v2.The latest version v2 of Universal Checkout Android SDK introduces a few breaking changes.
Universal Checkout v2 SDK is super efficient and simpler to integrate. Going forward, the prior Primer Checkout SDK v1.x.x will be no longer supported.
Key Highlights
For more details about the new features and to see specific code examples, refer to the other sections of this guide.Automatic Payment Creation
Universal Checkout Android SDK v2 now creates, resumes and handles payments under the hood 🎉The automatic payment flow is activated by default.When migrating to Android SDK v2, you need to use the following simpler code for payment creation:private val listener = object : PrimerCheckoutListener {
override fun onCheckoutCompleted(checkoutData: PrimerCheckoutData) {
// show an order confirmation screen
}
}
Primer.instance.configure(listener = listener)
Primer.instance.showUniversalCheckout(context, clientToken)
private val listener = object : CheckoutEventListener {

   override fun onCheckoutEvent(e: CheckoutEvent) {

      when (e) {

         is CheckoutEvent.TokenizationSuccess -> {
            // Create a payment
            // If payment fails: show error message
            // If payment succeeds: show a success message
            // If payment has a required action: return the new client token
         }

         is CheckoutEvent.ResumeSuccess -> {
            // Resume the payment
            // If payment fails: show error message
            // If payment succeeds: show a success message
            // If payment has a required action: return the new client token
         }
      }
   }
}

Primer.instance.configure(listener = listener)

Primer.instance.showUniversalCheckout(context, clientToken)
CheckoutEvent.TokenizationSuccess and CheckoutEvent.ResumeSuccess. Not anymore.We have redesigned and changed this callback and you will no longer have to listen to different events but rather to different callbacks. But even now, you are no longer required to use onTokenizeSuccess and onResumeSuccess callbacks. This essentially means that you do not need to make any API calls for creating and resuming payments.Those can be edited out of your integration code.All this results in an even simpler integration to maintain!With the new SDK, you can simply listen to the PAYMENT.STATUS webhook and the callback onCheckoutCompleted to process successful and even more secure payments as compared to the earlier versions.Primer listener changes
We have completely changed how you are receiving events/callbacks from Android SDK.Previously you had to use onCheckoutEvent callback that was receiving different events from the SDK. We have updated it to a more natural approach and now all events are translated to different callbacks:| Earlier v1.x.x | Latest v2 SDK |
|---|
CheckoutEvent.TokenizationSuccess | onTokenizeSuccess * |
CheckoutEvent.ResumeSuccess | onResumeSuccess * |
CheckoutEvent.Exit | onDismissed |
CheckoutEvent.TokenizationError | onFailed |
CheckoutEvent.APIError | onFailed |
CheckoutEvent.ResumeError | onFailed |
manual flow. Won’t be called if paymentHandling is AUTO, which is the default valueMoreover, we have renamed CheckoutEventListener → PrimerCheckoutListenerClient Session Actions Automation
Earlier versions of Primer Checkout SDK required you to integrate using onClientSessionActions.Now, with the latest SDK v2, as the customer interacts with the UI, Universal Checkout takes care of setting up “client session actions” via onClientsessionActions().Developers are no longer required to call this function anymore and it has been removed from the SDK. Instead, now you can set up the following callbacks:
onClientSessionUpdatedonBeforeClientSessionUpdated
Earlier release of SDK had Primer Checkout functionality that was sending you Client session actions in order to enable you to update the client session according to the merchant checkout requirements. This is now completely managed automatically by the Primer Universal Android SDK v2.The latest SDK can now collect various customer data such as the billing address, customer contact details and update the client session by itself. It no longer requires any explicit developer initiated actions or function calls to update these details while integrating with Primer.
Payment Options Updates
The following payment method options in Primer Checkout SDK v1.x.x are no longer available in the latest Universal Checkout SDK v2:Developers must now specify the order and customer details when creating the client session with .We have completely restructured how you are passing your local settings to SDK. Earlier, you would be passing PrimerConfig object to the SDK with various options:Primer.instance.configure(PrimerConfig(...))
PrimerSettings:Primer.instance.configure(PrimerSettings(...))
Miscellaneous Updates
PrimerSettings structure has been refactored and PrimerTheme has been integrated within it. Check the PrimerSettings API Reference for details.
| Earlier v1.x.x | Latest v2 SDK |
|---|
PaymentMethodToken | PrimerPaymentMethodToken |
ResumeHandler | PrimerResumeDecisionHandler |
Resume handler updates
handler.handleError(error: Error) → handler.handleFailure(message: String?)handler.handleNewClientToken(clientToken: String) → handler.continueWithNewClientToken(clientToken: String)
Removed Items
All the deprecated methods in v1 have been removed and replaced with other methods where applicable:Class Primer:
| Earlier v1.x.x | Latest v2 SDK |
|---|
initialize | configure |
showCheckout | showUniversalCheckout |
showVault | showVaultManager |
showSuccess | Removed |
showError | Removed |
showProgressIndicator | Removed |
Interface PrimerCheckoutListener:
onClientSessionActions → RemovedonTokenAddedToVault → Removed
Class PrimerSettings:
All the deprecated classes in v1 have been removed:Also, we have removed:
PrimerConfigBusinessAddress
Migrating from v1 to v2
The latest iOS SDK has evolved significantly from the previous release SDK v1. This guide describes what is new in v2, what has changed from v1 and what you need to do to migrate to the latest Universal Checkout SDK v2.The latest version v2 of Universal Checkout iOS SDK introduces a few breaking changes.
Universal Checkout v2 SDK is super efficient and simpler to integrate. Going forward, the prior Primer Checkout SDK v1.x.x will be no longer supported.
Key Highlights
- Universal Checkout now creates payments automatically in a more secure manner
- Some of the earlier payment method options are no longer required, therefore removed or addressed via other calls or functions
- We’ve made major improvements to the SDK’s delegate and settings
For more details about the new features and to see specific code examples, refer to the other sections of this guide.Automatic Payment Creation
Universal Checkout iOS SDK v2 now creates, resumes and handles payments under the hood 🎉The automatic payment flow is activated by default.When migrating to iOS SDK v2, you need to use the following simpler code for payment creation:import PrimerSDK
class MyViewController: UIViewController {
override func viewDidLoad() {
super.viewDidLoad()
// Initialize the SDK with the default settings.
Primer.shared.configure(delegate: self)
}
func startUniversalCheckout() {
Primer.shared.showUniversalCheckout(clientToken: self.clientToken)
}
}
extension MyViewController: PrimerDelegate {
func primerDidCompleteCheckoutWithData(_ data: CheckoutData) {
// Primer checkout completed with data
}
}
import PrimerSDK

class MyViewController: UIViewController {

   override func viewDidLoad() {
      super.viewDidLoad()
      // Initialize the SDK with the default settings.
      let settings = PrimerSettings(
         amount: amount,
         currency: currency
      )

      Primer.shared.configure(settings: settings)
      Primer.shared.delegate = self
   }

   func startUniversalCheckout() {
      Primer.shared.showUniversalCheckout(on: self)
   }
}

extension MyViewController: PrimerDelegate {

   func clientTokenCallback(_ completion: @escaping (String?, Error?) -> Void) {
      // API call to fetch client token from your backend.
      fetchClientToken() { (token, err) in
         completion(token, err)
      }
   }

   func onTokenizeSuccess(_ paymentMethodToken: PaymentMethodToken, resumeHandler: ResumeHandlerProtocol) {
      // Send the payment method token to your server to create a payment
      sendPaymentMethodToken(token: paymentMethodToken) { (res, err) in
         if let err = err {
            resumeHandler.handle(error: err)
         } else if let res = res {
            guard let requiredActionDic = res["requiredAction"] as? [String: Any],
                  let clientToken = requiredActionDic["clientToken"] as? String
            else {
               resumeHandler.handleSuccess()
               return
            }
            resumeHandler.handle(newClientToken: clientToken)
         }
      }
   }

   func onResumeSuccess(_ resumeToken: String, resumeHandler: ResumeHandlerProtocol) {
      // Resume the payment
      sendResumeToken(resumeToken) { (res, err) in
         if let err = err {
            resumeHandler.handle(error: err)
         } else if let res = res {
            resumeHandler.handleSuccess()
         }
      }
   }
}
CheckoutEvent.TokenizationSuccess and CheckoutEvent.ResumeSuccess. Not anymore.We have redesigned and changed this callback and you will no longer have to listen to different events but rather to different callbacks. But even now, you are no longer required to use onTokenizeSuccess and onResumeSuccess callbacks. This essentially means that you do not need to make any API calls for creating and resuming payments.Those can be edited out of your integration code.All this results in an even simpler integration to maintain!With the new SDK, you can simply listen to the PAYMENT.STATUS webhook and the callback onCheckoutCompleted to process successful and even more secure payments as compared to the earlier versions.Primer listener changes
We have completely changed how you are receiving events via the PrimerDelegate.Previously you had to use the delegate functions that were returning different SDK events. We have updated it to a more natural approach and now all events are translated to different callbacks:| Earlier v1.x.x | Latest v2 SDK |
|---|
onTokenizeSuccess | primerDidTokenizePaymentMethod * |
onResumeSuccess | primerDidResumeWith * |
onDismiss | primerDidDismiss |
checkoutFailed | primerDidFailWithError |
onResumeError | primerDidFailWithError |
manual flow. Won’t be called if paymentHandling is AUTO, which is the default valueClient Session Actions Automation
Earlier versions of Primer Checkout SDK required you to integrate using onClientSessionActions.Now, with the latest SDK v2, as the customer interacts with the UI, Universal Checkout takes care of setting up the “client session actions”.🛑 Developers are no longer required to call this function and it has been removed from the SDK. Instead, now you can set up the following callbacks:
primerClientSessionDidUpdateprimerClientSessionWillUpdate
Earlier release of SDK had Primer Checkout functionality that was sending you Client session actions in order to enable you to update the client session according to the merchant checkout requirements. This is now completely managed automatically by the Primer Universal iOS SDK v2.The latest SDK can now collect various customer data such as the billing address, customer contact details and update the client session by itself. It no longer requires any explicit developer initiated actions or function calls to update these details while integrating with Primer.
Payment Options Updates
The following payment method options in Primer Checkout SDK v1.x.x are no longer available in the latest Universal Checkout SDK v2:
OrderOrderItemCustomerAddress
Instead, developers must now specify the order and customer details when creating the client session with .We have completely restructured how you are passing your local settings to SDK. Earlier, you would be passing PrimerSettings and a PrimerTheme object to the SDK with various options:Primer.shared.configure(settings: settings, theme: theme)
Primer.shared.configure(settings: settings, delegate: self)
Miscellaneous Updates
PrimerSettings structure has been refactored and PrimerTheme has been integrated within it. Check the PrimerSettings API Reference for details.- Renamed
PaymentMethodToken → PrimerPaymentMethodTokenData
- Renamed
ResumeHandler → PrimerResumeDecisionHandler
showUniversalCheckout and showVaultManager receive different arguments. You can find documentation on them in the SDK API reference.
Resume handler updates
Some delegate functions provide a decision handler, e.g. primerWillCreatePaymentWithData(:decisionHandler:). You can process the data provided and once you’re ready you can call the decision handler with your relevant decision. Once you do, the SDK will continue the flow.| Earlier v1.x.x | Latest v2 SDK |
|---|
handler.handleError(error: Error) | decisionHandler(.fail(withErrorMessage: String?)) |
handler.handleNewClientToken(clientToken: String) | decisionHandler(.continueWithNewClientToken(_ clientToken: String)) |
handler.handleSuccess() | decisionHandler(.succeed()) |
Removed Items
All the deprecated methods in v1 have been removed and replaced with other methods where applicable:
tokenAddedToVault → RemovedonClientSessionActions → Removed
All the deprecated classes in v1 have been removed. They are instead set on the backend when creating the client session:
OrderOrderItemCustomerAddress
Migrating from v1 to v2
The latest React Native (RN) SDK has evolved significantly from the previous release SDK v1. This guide describes what is new in v2, what has changed from v1 and what you need to do to migrate to the latest Universal Checkout SDK v2.The latest version v2 of Universal Checkout RN SDK introduces a few breaking changes.
Universal Checkout v2 SDK is super efficient and simpler to integrate. Going forward, the prior Primer Checkout SDK v1.x.x will be deprecated.
Key Highlights
For more details about the new features and to see specific code examples, refer to the sections below.Automatic Payment Creation
Universal Checkout React Native SDK v2 now creates, resumes and handles payments under the hood 🎉The automatic payment flow is activated by default.When migrating to React Native SDK v2, you need to use the following simpler code for payment creation:import {
Primer,
PrimerSettings,
PrimerCheckoutData
} from '@primer-io/react-native';
const CheckoutScreen = async (props: any) => {
const onCheckoutComplete = (checkoutData: PrimerCheckoutData) => {
// Show a success screen
}
const onUniversalCheckoutButtonTapped = async () => {
const settings: PrimerSettings = {
onCheckoutComplete: onCheckoutComplete
}
// Configure the SDK
await Primer.configure(settings)
// Ask your backend to create a client session
const clientToken = await createClientSession(clientSessionRequestParams)
// Present Universal Checkout
await Primer.showUniversalCheckout(clientToken)
}
}
import { Primer } from '@primer-io/react-native';

const CheckoutScreen = (props: any) => {

   const onTokenizeSuccess = (req, res) => {
      createPayment({
         paymentMethod: req.token
      })
      .then((payment) => {
         // handle required actions if present.
         if (payment.requiredAction?.name) {
            // ensure the result id is stored somewhere.
            setPaymentId(result.id)
            // resume the SDK with the result clientToken.
            res.handleNewClientToken(result.requiredAction?.clientToken);
         } else {
            // resume the SDK passing a null object.
            res.handleSuccess();
         }
      })
      .catch(() => res.resumeWithError(errorMessage));
   }

   const onResumeSuccess = (req, res) => {
      resumeSession({
         id: paymentId,
         resumeToken: req
      })
      .then((payment) => {
         if (payment.status in ['FAILED', 'DECLINED', 'CANCELLED', 'PENDING']) {
            res.handleError(errorMessage);
         } else {
            res.handleSuccess();
         }
      })
      .catch(() => res.handleError(errorMessage));
   }

   const onUniversalCheckoutButtonTapped = async () => {
      try {
         const clientToken = await createClientSession(clientSessionRequestParams);

         // Present Universal Checkout
         Primer.showUniversalCheckout(clientToken, {
            onTokenizeSuccess,
            onResumeSuccess
         });
      } catch (err) {
         // Handle error
      }
   }
}
onTokenizeSuccess and onResumeSuccess were called. Not anymore.We have redesigned and changed this callback and you will no longer have to listen to different events but rather to different callbacks. But even now, you are no longer required to use onTokenizeSuccess and onResumeSuccess callbacks. This essentially means that you do not need to make any API calls for creating and resuming payments.Those can be edited out of your integration code.All this results in an even simpler integration to maintain!With the new SDK, you can simply listen to the PAYMENT.STATUS webhook and the callback onCheckoutCompleted callback will be called.Primer listener changes
We have completely changed how you are receiving events, now you can add your callbacks in the SDK’s settings when you configure the SDK.Previously you had to separately add callbacks in the showUniversalCheckout function.We have updated it to a more natural approach and now all events are translated to different callbacks:| Earlier v1.x.x | Latest v2 SDK |
|---|
onTokenizeSuccess | onTokenizeSuccess * |
onResumeSuccess | onResumeSuccess * |
Exit | onDismissed |
onDismiss | onDismiss |
checkoutFailed | onFailed |
onResumeError | onFailed |
manual flow. Won’t be called if paymentHandling is AUTO, which is the default valueClient Session Actions Automation
Earlier versions of Primer Checkout SDK required you to integrate using onClientSessionActions.Now, with the latest SDK v2, as the customer interacts with the UI, Universal Checkout takes care of setting up the “client session actions”.Developers are no longer required to call this function and it has been removed from the SDK. Instead, now you can set up the following callbacks:
onClientSessionUpdateonBeforeClientSessionUpdate
Earlier release of SDK had Primer Checkout functionality that was sending you Client session actions in order to enable you to update the client session according to the merchant checkout requirements. This is now completely managed automatically by the Primer Universal React Native SDK v2.The latest SDK can now collect various customer data such as the billing address, customer contact details and update the client session by itself. It no longer requires any explicit developer initiated actions or function calls to update these details while integrating with Primer.
Payment Options Updates
The following payment method options in Primer Checkout SDK v1.x.x are no longer available in the latest Universal Checkout SDK v2.
OrderOrderItemCustomerAddress
Instead, developers must now specify the order and customer details when creating the client session with .We have completely restructured how you are passing your local settings to SDK. Earlier, you would be passing a PrimerConfig object—that contained the SDK settings and callbacks—to the SDK in the showUniversalCheckout function.Primer.configure(settings);
PrimerSettings on the configure function, as per the Quick Start Guide. In case you need more customization, you can find the PrimerSettings API reference here.Primer.showUniversalCheckout(clientToken);
Miscellaneous Updates
PrimerSettings structure has been refactored and PrimerTheme has been integrated within it. Check the PrimerSettings API Reference for details.- Renamed
PaymentMethodToken → PrimerPaymentMethodTokenData
- Renamed
ResumeHandler → PrimerResumeDecisionHandler
showUniversalCheckout and showVaultManager receive different arguments. You can find documentation on them in the SDK API reference.
Removed Items
All the deprecated methods in v1 have been removed and replaced with other methods where applicable:
onVaultSuccess → RemovedonClientSessionActions → Removed
All the deprecated classes in v1 have been removed. They are instead set on the backend when creating the client session.
OrderOrderItemCustomerAddress