Overview
With version 2 of our Web SDK, Universal Checkout automatically creates and handles Payments by default. This greatly reduces the complexity and amount of boilerplate required to integrate Primer. For backward compatibility reasons, it is still possible to manually create and resume payments. Follow this guide to setup Universal Checkout so that you handle the payment lifecycle.Flow
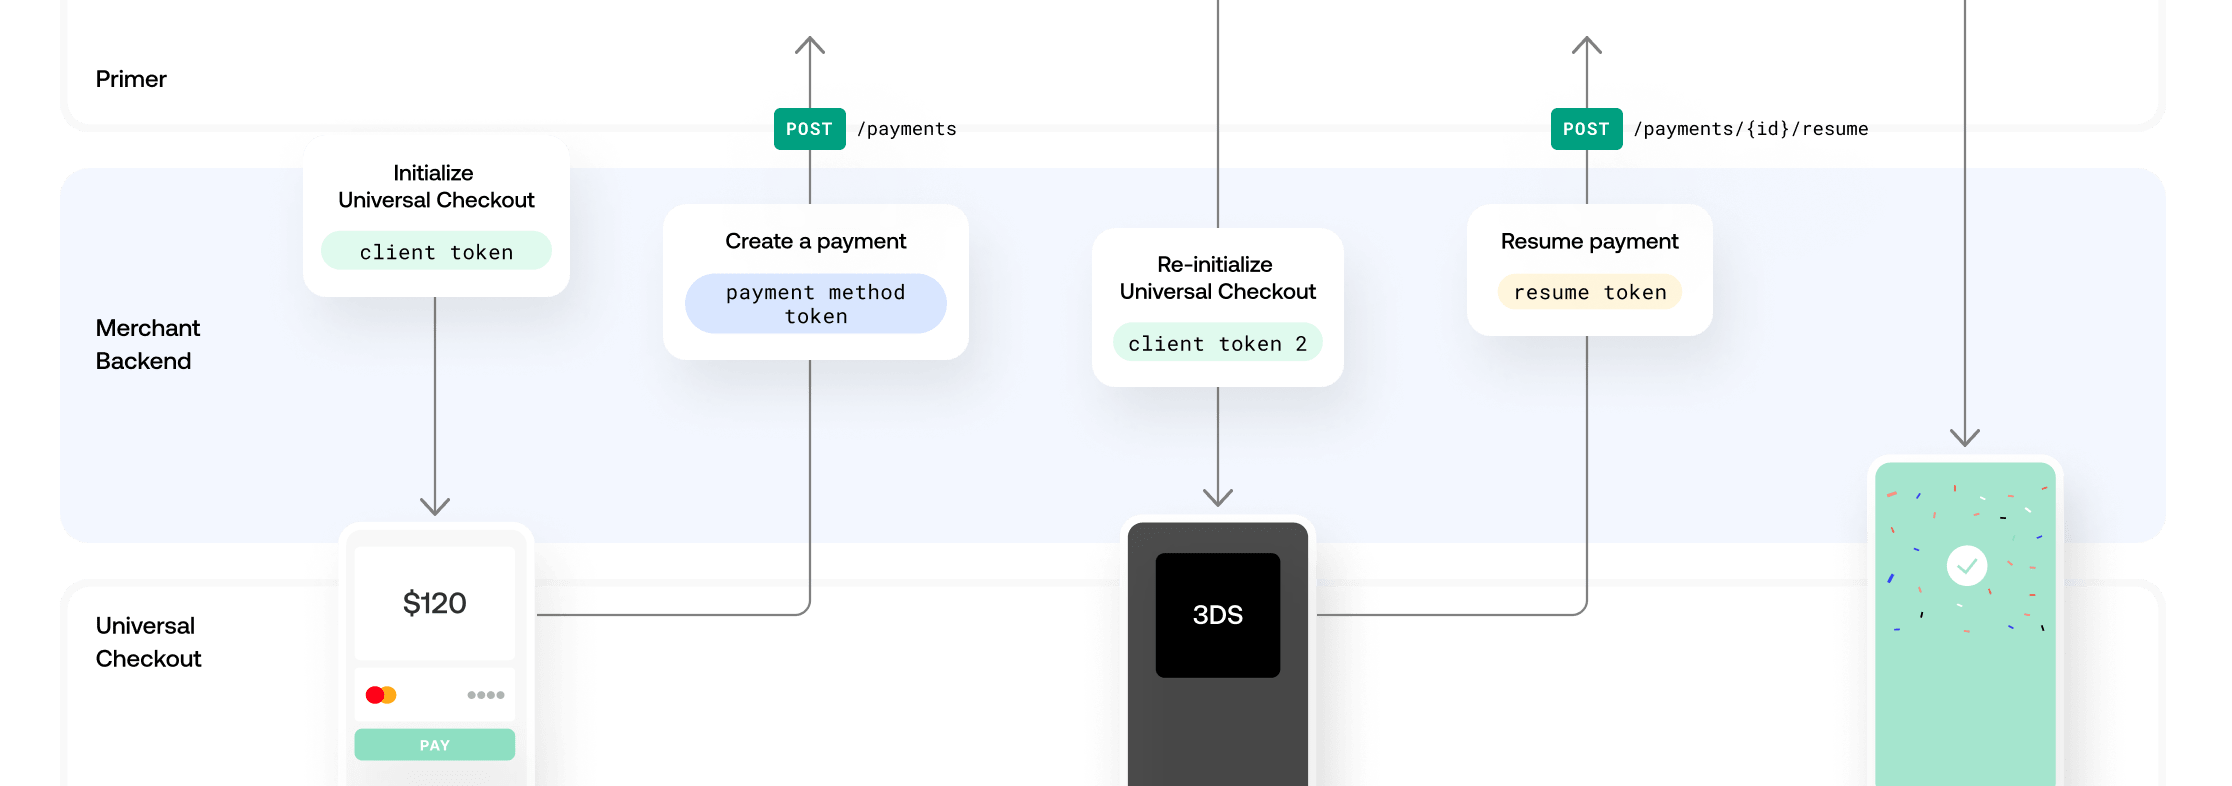
- Generate a
clientTokenon your backend by creating a Client Session with - Initialize Universal Checkout with the
clientTokento render the UI. - Universal Checkout will generate a
paymentMethodTokenwhen the customer submits their payment data, or when they select particular payment methods. - Create a payment using the
paymentMethodTokenvia the Payments API - If the response indicates a
requiredAction, you’ll get a newclientToken. - Pass the
clientTokenback to Universal Checkout to render next steps, like 3DS, and get aresumeToken. - Call with the
resumeTokento resume the payment and wrap things up. (If a newrequiredActionis returned, you’ll have to go back to step 5.)
Generate a Client Token
Get an API Key
Ensure you have an API key configured. Make sure to set the following scopes for your API Key:client_tokens:writetransactions:authorize
Generate a Client Session
Follow the instructions here to create a client session, which will be used to initialize the checkout.Set up Universal Checkout
- Web
- Android - Kotlin
- Android - Java
- iOS
- React Native
Step 1. Turn off automatic payment creation
The Universal Checkout optionpaymentHandling defines how the SDK should handle payment creation and resume.Set paymentHandling to MANUAL to turn off automatic payment handling.This disables the callbacks onBeforePayment and onCheckoutComplete.Typescript
Primer.showUniversalCheckout(clientToken, {
	/* Other options... */

	paymentHandling: 'MANUAL',
})
Step 2. Handle callbacks for creating and resuming payments
Two callbacks must be implemented:onTokenizeSuccess()to create payments withpaymentMethodTokenonResumeSuccess()to resume payments withresumeToken
Typescript
Primer.showUniversalCheckout(clientToken, {
	/* Other options... */

	paymentHanding: 'MANUAL',
	async onTokenizeSuccess(paymentMethodTokenData, handler) {
		// Send the Payment Method Token to your server
		// to create a payment using Payments API
		const response = await createPayment(paymentMethodTokenData.token)

		// Call `handler.handleFailure` to cancel the flow and display an error message
		if (!response) {
			return handler.handleFailure('The payment failed. Please try with another payment method.')
		}

		// If a new clientToken is available, call `handler.continueWithNewClientToken` to refresh the client session.
		// The checkout will automatically perform the action required by the Workflow.
		if (response.requiredAction.clientToken) {
			return handler.continueWithNewClientToken(response.requiredAction.clientToken)
		}

		// Display the success screen
		return handler.handleSuccess()
	},

	async onResumeSuccess(resumeTokenData, handler) {
		// Send the resume token to your server to resume the payment
		const response = await resumePayment(resumeTokenData.resumeToken)

		// Call `handler.handleFailure` to cancel the flow and display an error message
		if (!response) {
			return handler.handleFailure('The payment failed. Please try with another payment method.')
		}

		// If a new clientToken is available, call `handler.continueWithNewClientToken` to refresh the client session.
		// The checkout will automatically perform the action required by the Workflow
		if (response.requiredAction.clientToken) {
			return handler.continueWithNewClientToken(response.requiredAction.clientToken)
		}

		// Display the success screen
		return handler.handleSuccess()
	},
})
Handle onTokenizeSuccess() callback
- When a customer submits their payment data, the payment details are tokenized and you’ll receive a
paymentMethodTokeninonTokenizeSuccess() - Create a payment request with the
paymentMethodToken - If the payment is successful, call
handler.handleSuccess()in order to display a success screen. - If the payment is unsuccessful, call
handler.handleFailure(errorMessage)to display an error / failed message. - Payments API may return a new
clientTokenfor additional steps (in therequiredActionson the response). In this case, callhandler.continueWithNewClientToken(clientToken)to the checkout.
Handle onResumeSuccess() callback
Handling
onResumeSuccess() is required to fully support 3DS and the majority of payment methods.- You will receive a
resumeTokenvia theonResumeSuccess()callback if applicable - Send a resume payment request with the
resumeToken - If the payment is successful, call
handler.handleSuccess()in order to display a success screen. - If the payment is unsuccessful, call
handler.handleFailure(errorMessage)to display an error / failed message. - Payments API may again return a new
clientTokenfor additional steps. In this case, callhandler.continueWithNewClientToken(clientToken)again.
Step 1. Install
Add the following to yourapp/build.gradle fileKOTLIN
repositories {
  mavenCentral()
}

dependencies {
  implementation 'io.primer:android:latest.version'
}
app/build.gradle file:KOTLIN
android {
    kotlinOptions {
        freeCompilerArgs += '-Xjvm-default=all'
    }
}
Step 2. Initialize the SDK
Prepare thePrimerCheckoutListener that will handle the callbacks that happen during the lifecycle.Import the Primer SDK and set its listener as shown in the following example.In order to use manual payment handling, you have to set paymentHandling to **PrimerPaymentHandling.MANUAL** in the PrimerSettings.KOTLIN
class CheckoutActivity : AppCompatActivity() {

    private val listener = object : PrimerCheckoutListener {

        override fun onTokenizeSuccess(
            paymentMethodToken: PrimerPaymentMethodToken,
            decisionHandler: PrimerResumeDecisionHandler
        ) {
              // use the received paymentMethodToken to make the payment
              // and use decisionHandler to instruct SDK about next steps based on payment status
        }

        override fun onResumeSuccess(resumeToken: String, decisionHandler: PrimerResumeDecisionHandler) {
             // use the received resumeToken to resume the payment
             // and use decisionHandler to instruct SDK about next steps based on payment status
        }
    }

    override fun onCreate(savedInstanceState: Bundle?) {
        super.onCreate(savedInstanceState)
        setContentView(R.layout.activity_main)

        configureCheckout()
    }

    private fun configureCheckout() {
        // Set the paymentHandling to manual
        val settings = PrimerSettings(paymentHandling = PrimerPaymentHandling.MANUAL)
        Primer.instance.configure(settings, listener)
    }
}
Check the SDK API here to customize your SDK settings.
Step 3. Generate a client token
For more information on generating a client token, take a look at our client session guide.
KOTLIN
class CheckoutActivity : AppCompatActivity() {

    // Other code goes here

    private lateinit var viewModel: CheckoutViewModel

    override fun onCreate(savedInstanceState: Bundle?) {
        super.onCreate(savedInstanceState)
        setContentView(R.layout.activity_main)

        configureCheckout()
        setupViewModel()
        setupObservers()
        fetchClientToken()
    }

    private fun setupViewModel() {
        viewModel = ViewModelProvider(this).get(CheckoutViewModel::class.java)
    }

    private fun fetchClientToken() = viewModel.fetchClientToken()

    private fun setupObservers() {
        viewModel.clientToken.observe(this) { clientToken ->
            // show checkout
        }
    }
}
KOTLIN
class CheckoutViewModel : ViewModel() {

    private val _clientToken = MutableLiveData<String>()
    val clientToken: LiveData<String> = _clientToken

    fun fetchClientToken() {
        // fetch your token here (ask your backend to provide token)
        _clientToken.postValue("retrieved_token")
    }
}
Step 4. Show Universal Checkout
When the client token is retrieved, show Universal Checkout.KOTLIN
class CheckoutActivity : AppCompatActivity() {

    // other code goes here

    private fun setupObservers() {
        viewModel.clientToken.observe(this) { clientToken ->
            showUniversalCheckout(clientToken)
        }
    }

    private fun showUniversalCheckout(clientToken: String) {
        Primer.instance.showUniversalCheckout(this, clientToken)
    }
}
You should now be able to see Universal Checkout! The user can now interact with Universal Checkout.
Step 5. Handle callbacks for creating and resuming payments
Once the payment method data has been securely captured, Primer will return a uniformpaymentMethodToken via onTokenizeSuccess that can be safely passed to your server to create a payment with the Payments API.Handle onTokenizeSuccess callback
-
When a customer submits their payment data, the payment details are tokenized and you’ll receive a
paymentMethodTokeninonTokenizeSuccess. - Create a payment request with the payment method token data.
-
If the payment is successful, call
decisionHandler.handleSuccess()in order to display a success screen. -
If the payment is unsuccessful, call
decisionHandler.handleFailure("Your error message")to display an error / failed message. -
Payments API may return a
requiredActionwith a newclientTokenfor additional steps. In this case, calldecisionHandler.continueWithNewClientToken(clientToken).
KOTLIN
private val listener = object: PrimerCheckoutListener {

    override fun onTokenizeSuccess(
        paymentMethodToken: PrimerPaymentMethodToken,
        decisionHandler: PrimerResumeDecisionHandler
    ) {
        viewModel.sendPaymentMethodToken(paymentMethodToken, decisionHandler)
    }
}
KOTLIN
class CheckoutViewModel : ViewModel() {

  // ⚠️ remember to call decisionHandler to resume SDK flow.
  fun sendPaymentMethodToken(paymentMethodToken: PrimerPaymentMethodToken, decisionHandler: PrimerResumeDecisionHandler)  {
    val paymentResponse =  //...
    if (paymentResponse.isSuccessful()) {
      decisionHandler.handleSuccess()
    } else if (paymentResponse.isPending()) {
      decisionHandler.continueWithNewClientToken(paymentResponse.requiredAction.clientToken)
    } else {
      decisionHandler.handleFailure("Your error message.")
    }
  }
}
Handle onResumeSuccess callback
Once the required actions are completed, Primer will return resumeToken via onResumeSuccess that can be safely passed to your server to resume a payment with the Payments API.-
You will receive a
resumeTokenvia theonResumeSuccess()callback if applicable. -
Send a resume payment request with
resumeToken -
If the payment is successful, call
decisionHandler.handleSuccess()in order to display a success screen. -
If the payment is unsuccessful, call
decisionHandler.handleFailure("Your error message")to display an error / failed message. -
Payments API may return a
requiredActionwith a newclientTokenfor additional steps. In this case, calldecisionHandler.continueWithNewClientToken(clientToken).
KOTLIN
private val listener = object : PrimerCheckoutListener {

        override fun onResume(resumeToken: String, decisionHandler: PrimerResumeDecisionHandler) {
            viewModel.sendResumeToken(resumeToken, decisionHandler)
        }
    }
KOTLIN
class CheckoutViewModel : ViewModel() {

  // ⚠️ remember to call decisionHandler to resume SDK flow.
  fun sendResumeToken(resumeToken: String, decisionHandler: PrimerResumeDecisionHandler)  {
    val paymentResponse =  //...
    if (paymentResponse.isSuccessful()) {
      decisionHandler.handleSuccess()
    } else if (paymentResponse.isPending()) {
      decisionHandler.continueWithNewClientToken(paymentResponse.requiredAction.clientToken)
    } else {
      decisionHandler.handleFailure("Your error message.")
    }
  }
}
Step 1. Install
Add the following to yourapp/build.gradle fileJava
repositories {
  mavenCentral()
}

dependencies {
  implementation 'io.primer:android:latest.version'
}
Step 2. Initialize the SDK
Prepare thePrimerCheckoutListener that will handle the callbacks that happen during the lifecycle.Import the Primer SDK and set its listener as shown in the following example.In order to use manual payment handling, you have to set paymentHandling to **PrimerPaymentHandling.MANUAL** in the PrimerSettings.Java
public class CheckoutActivity extends AppCompatActivity {

    private final PrimerCheckoutListener listener = new PrimerCheckoutListener() {

        @Override
        public void onTokenizeSuccess(@NonNull PrimerPaymentMethodToken primerPaymentMethodToken,
                                      @NonNull PrimerResumeDecisionHandler decisionHandler) {
              // use the received paymentMethodToken to make the payment
              // and use decisionHandler to instruct SDK about next steps based on payment status
        }

        @Override
        public void onResumeSuccess(@NonNull String resumeToken,
                             @NonNull PrimerResumeDecisionHandler decisionHandler) {
             // use the received resumeToken to resume the payment
             // and use decisionHandler to instruct SDK about next steps based on payment status
        }
    };

    @Override
    protected void onCreate(@Nullable Bundle savedInstanceState) {
        super.onCreate(savedInstanceState);
        setContentView(R.layout.activity_main);

        configureCheckout();
    }

    private void configureCheckout() {
        // Set the paymentHandling to manual
        PrimerSettings settings = new PrimerSettings();
        settings.setPaymentHandling(PrimerPaymentHandling.MANUAL);

        Primer.getInstance().configure(settings, listener);
    }
}
Check the SDK API here to customize your SDK settings.
Step 3. Generate a client token
For more information on generating a client token, take a look at our client session guide.
Java
public class CheckoutActivity extends AppCompatActivity {

private CheckoutViewModel viewModel;

@Override
    protected void onCreate(@Nullable Bundle savedInstanceState) {
        super.onCreate(savedInstanceState);
        setContentView(R.layout.activity_main);

        configureCheckout();
        setupViewModel();
        setupObservers();
        fetchClientToken();
    }

    private void setupViewModel() {
        viewModel = new ViewModelProvider(this).get(CheckoutViewModel.class);
    }

    private void fetchClientToken() {
        viewModel.fetchClientToken();
    }

    private void setupObservers() {
        viewModel.clientToken.observe(this, clientToken -> {

        });
    }
}
Java
public class CheckoutViewModel extends ViewModel {

    private final MutableLiveData<String> _clientToken = new MutableLiveData<>();
    public LiveData<String> clientToken = _clientToken;

    public void fetchClientToken() {
        // fetch your token here (ask your backend to provide token)
        _clientToken.postValue("retrieved_token");
    }
}
Step 4. Show Universal Checkout
When the client token is retrieved, show Universal Checkout.Java
public class CheckoutActivity extends AppCompatActivity {

    // other code goes here

    private void setupObservers() {
          viewModel.clientToken.observe(this, this::showUniversalCheckout);
    }

    private void showUniversalCheckout(String clientToken) {
          Primer.getInstance().showUniversalCheckout(this, clientToken);
    }
}
You should now be able to see Universal Checkout! The user can now interact with Universal Checkout.
Step 5. Handle callbacks for creating and resuming payments
Once the payment method data has been securely captured, Primer will return a uniformpaymentMethodToken via onTokenizeSuccess that can be safely passed to your server to create a payment with the Payments API.Handle onTokenizeSuccess callback
-
When a customer submits their payment data, the payment details are tokenized and you’ll receive a
paymentMethodTokeninonTokenizeSuccess. - Create a payment request with the payment method token data.
-
If the payment is successful, call
decisionHandler.handleSuccess()in order to display a success screen. -
If the payment is unsuccessful, call
decisionHandler.handleFailure("Your error message")to display an error / failed message. -
Payments API may return a
requiredActionwith a newclientTokenfor additional steps. In this case, calldecisionHandler.continueWithNewClientToken(clientToken).
Java
  private final PrimerCheckoutListener listener = new PrimerCheckoutListener() {

    @Override
        public void onTokenizeSuccess(@NonNull PrimerPaymentMethodToken primerPaymentMethodToken,
                                      @NonNull PrimerResumeDecisionHandler decisionHandler) {

            viewModel.sendPaymentMethodToken(primerPaymentMethodToken)
            // ⚠️ remember to call decisionHandler to resume SDK flow.
        }
    };
Handle onResumeSuccess callback
Once the required actions are completed, Primer will return resumeToken via onResumeSuccess that can be safely passed to your server to resume a payment with the Payments API.-
You will receive a
resumeTokenvia theonResumeSuccess()callback if applicable. -
Send a resume payment request with
resumeToken -
If the payment is successful, call
decisionHandler.handleSuccess()in order to display a success screen. -
If the payment is unsuccessful, call
decisionHandler.handleFailure("Your error message")to display an error / failed message. -
Payments API may return a
requiredActionwith a newclientTokenfor additional steps. In this case, calldecisionHandler.continueWithNewClientToken(clientToken).
Java
  private final PrimerCheckoutListener listener = new PrimerCheckoutListener() {

    @Override
        public void onResumeSuccess(@NonNull String resumeToken,
                             @NonNull PrimerResumeDecisionHandler primerResumeDecisionHandler) {
            viewModel.sendResumeToken(resumeToken)
            // ⚠️ remember to call decisionHandler to resume SDK flow.
        }
    };
Step 1. Install the SDK
With CocoaPods
The iOS SDK is available with Cocoapods. Just add the PrimerSDK pod and runpod install .RUBY
target 'MyApp' do
  # Other pods...

  # Add this to your Podfile
  pod 'PrimerSDK', '~> 2.0.0' # Add this line
end
pod install to install PrimerSDK on your workspace.For specific versions of the SDK, please refer to the changelog.In case you encounter an error that the bundle needs signing on Xcode 14, add the following post-install script in your podfile.
RUBY
post_install do |installer|
  installer.pods_project.targets.each do |target|
    if target.respond_to?(:product_type) and target.product_type == "com.apple.product-type.bundle"
      target.build_configurations.each do |config|
          config.build_settings['CODE_SIGNING_ALLOWED'] = 'NO'
      end
    end
  end
end
With Swift Package Manager
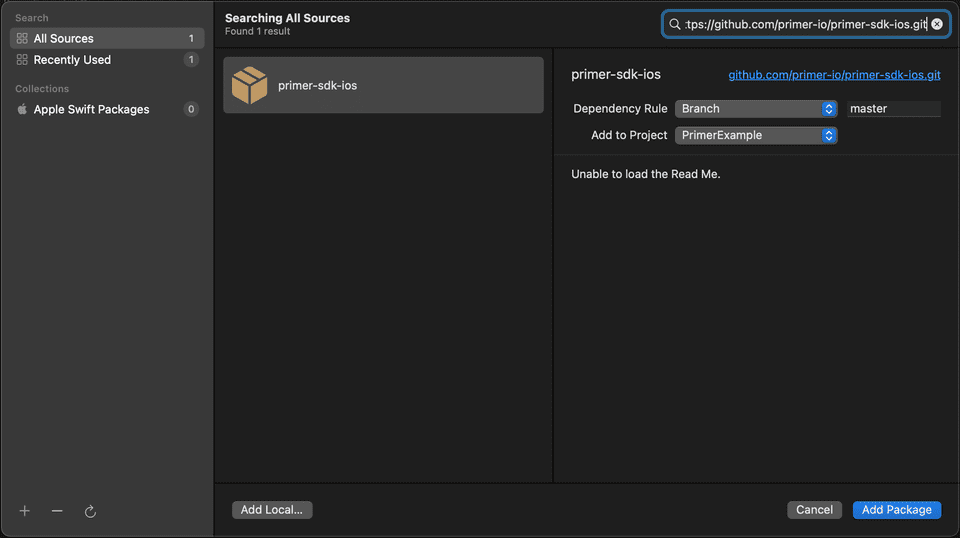
The Swift Package Manager is a tool for automating the distribution of Swift code and is integrated into Xcode. In order to add PrimerSDK with Swift Package Manager;- Select your project, and then navigate to
Package Dependencies - Click on the + button at the bottom-left of the
Packagessection - Paste https://github.com/primer-io/primer-sdk-ios.git into the Search Bar
- Press Add Package
- Let Xcode download the package and set everything up
Step 2. Initialize the SDK
Import the Primer SDK and set its delegate as shown in the following example. You have to setpaymentHandling: .manual in the PrimerSettings.SWIFT
import PrimerSDK

class MyViewController: UIViewController {

    override func viewDidLoad() {
        super.viewDidLoad()

        // Set the paymentHandling to manual.
        let settings = PrimerSettings(paymentHandling: .manual)
        Primer.shared.configure(settings: settings, delegate: self)
    }
}

extension MyViewController: PrimerDelegate {

    func primerDidTokenizePaymentMethod(_ paymentMethodTokenData: PrimerPaymentMethodTokenData, decisionHandler: @escaping (PrimerResumeDecision) -> Void) {
        // Use this method to create a payment.
    }

    func primerDidResumeWith(_ resumeToken: String, decisionHandler: @escaping (PrimerResumeDecision) -> Void) {
        // If needed, use this method to resume the previously created payment.
    }
}
Check the SDK API here to customize your SDK settings.
Step 3. Generate a client token
Check our guide on how to set up the client session here.
SWIFT
extension MyViewController {

    func requestClientToken(data: [String: Any], completion: @escaping (String?, Error?) -> Void) {
        Networking.createClientSession(data: data) { (clientToken, err) in
            completion(clientToken, err)
        }
    }
}
Step 4. Show Universal Checkout
At this step you should have a client token available. Call theshowUniversalCheckout(clientToken:) function (as shown below) to present the Universal Checkout.SWIFT
class MyViewController: UIViewController {

    func startUniversalCheckout() {
        Primer.shared.showUniversalCheckout(clientToken: self.clientToken)
    }
}
Step 5. Handle callbacks for creating and resuming payments
Once the payment method data has been securely captured, Primer will return a uniformpaymentMethodTokenData via primerDidTokenizePaymentMethod(:decisionHandler:). This can be safely passed to your server to create a payment with the Payments API.Handle primerDidTokenizePaymentMethod(:decisionHandler:)
-
When a customer submits their payment data, the payment details are tokenized and you’ll receive a
paymentMethodTokenDatainprimerDidTokenizePaymentMethod. - Create a payment request with the payment method token data.
-
If the payment is successful, call
decisionHandler(.succeed())in order to display a success screen. -
If the payment is unsuccessful, call
decisionHandler(.fail(withErrorMessage: "YOUR_ERROR_MESSAGE"))to display an error / failed message. -
Payments API may return a
requiredActionwith a newclientTokenfor additional steps. In this case, calldecisionHandler(.continueWithNewClientToken(clientToken)).
SWIFT
// use this method to create a payment.
func primerDidTokenizePaymentMethod(_ paymentMethodTokenData: PrimerPaymentMethodTokenData, decisionHandler: @escaping (PrimerResumeDecision) -> Void) {
    // ...
    // Call the resumeHandler to continue
    // ...

    // Send the payment method token data to your server to create a payment
    sendPaymentMethodToken(token: paymentMethodTokenData) { (res, err) in
        if let err = err {
            decisionHandler(.fail(withErrorMessage: "YOUR_ERROR_MESSAGE"))
        } else if let res = res {
            guard let requiredActionDic = res["requiredAction"] as? [String: Any],
                  let clientToken = requiredActionDic["clientToken"] as? String
            else {
                decisionHandler(.succeed())
                return
            }

            decisionHandler(.continueWithNewClientToken(clientToken))
        }
    }
}
Handle primerDidResumeWith(:decisionHandler:)
-
You will receive a
resumeTokenvia theprimerDidResumeWith(:decisionHandler:)callback if applicable. -
Send a resume payment request with
resumeToken -
If the payment is successful, call
decisionHandler(.succeed())in order to display a success screen. -
If the payment is unsuccessful, call
decisionHandler(.fail(withErrorMessage: "YOUR_ERROR_MESSAGE"))to display an error / failed message. -
Payments API may return a
requiredActionwith a newclientTokenfor additional steps. In this case, calldecisionHandler(.continueWithNewClientToken(clientToken)).
SWIFT
func primerDidResumeWith(_ resumeToken: String, decisionHandler: @escaping (PrimerResumeDecision) -> Void) {
    sendResumeToken(resumeToken) { (res, err) in
        if let err = err {
            decisionHandler(.continueWithNewClientToken(clientToken))
        } else if let res = res {
            decisionHandler(.succeed())
        }
    }
}
You should now be able to see Universal Checkout! The user can now interact with Universal Checkout, and you can create the payment.
Step 1. Turn off automatic payment creation
The Universal Checkout optionpaymentHandling defines how the SDK should handle payment creation.Set paymentHandling to MANUAL to turn off automatic payment handling. This will allow you to create the payment yourself (via your backend).This disables the callback onCheckoutComplete.Typescript
import {
	Primer,
	PrimerSettings,
	PrimerCheckoutData,
	PrimerTokenizationHandler,
	PrimerResumeHandler,
	PrimerPaymentMethodTokenData,
} from '@primer-io/react-native'

const CheckoutScreen = (props: any) => {
	const onUniversalCheckoutButtonTapped = async () => {
		try {
			const settings: PrimerSettings = {
				paymentHandling: 'MANUAL',
				/* Other options and callbacks */
			}

			await Primer.configure(settings)
		} catch (err) {
			// Handle error
		}
	}
}
See our SDK API Reference for more info on available settings.
Step 2. Handle callbacks for creating and resuming payments
There are two required callbacks:onTokenizeSuccessto create payments withpaymentMethodTokenonResumeSuccessto resume payments withresumeToken
Typescript
const CheckoutScreen = (props: any) => {

  const onTokenizeSuccess: async (
    paymentMethodTokenData: PrimerPaymentMethodTokenData,
    handler: PrimerTokenizationHandler
  ) => {
    // Will be fired when the payment method has been tokenized.

    // See implementation details below
  }

  const onResumeSuccess: async (
    resumeToken: string,
    handler: PrimerResumeHandler
  ) => {
    // Will be fired if the SDK is resumed after handling an action
    // like 3DS or a redirect-based payment method.

    // See implementation details below
  }

  const onError = (
    error: PrimerError,
    checkoutData: PrimerCheckoutData | null,
    handler: PrimerErrorHandler | undefined
  ) => {
    // Handle any errors.
    // checkoutData might be null if the payment creation flow hasn't reached the payment step.
  }

  const onUniversalCheckoutButtonTapped = async () => {
    try {
      const settings: PrimerSettings = {
        paymentHandling: "MANUAL",
        /* Other options... */
        onTokenizeSuccess,
        onResumeSuccess,
        onError,
      }

      await Primer.configure(settings);

    } catch (err) {
      // Handle error
    }
  };
}
See our SDK API Reference for the full list of callbacks.
Handle onTokenizeSuccess() callback
- When a customer submits their payment data, the payment details are tokenized and you’ll receive a
PrimerPaymentMethodTokenDataobject inonTokenizeSuccess() - Create a payment request with the
tokenof thePrimerPaymentMethodTokenDatareceived. - If the payment is successful, call
handler.handleSuccess()in order to display a success screen. - If the payment is unsuccessful, call
handler.handleFailure(errorMessage)to display an error / failed message. - Payments API may return a new
clientTokenfor additional steps (in therequiredActionson the response). In this case, callhandler.continueWithNewClientToken(clientToken)to the checkout.
Typescript
const onTokenizeSuccess: async (
		paymentMethodTokenData: PrimerPaymentMethodTokenData,
	  handler: PrimerTokenizationHandler
	) => {
			// Make an API call to your backend to create a payment.
			try {
				const paymentResponse = await createPayment(paymentMethodTokenData.token);

				// If the request failed you can cancel the flow and display an error message
        if (!paymentResponse) {
            handler.handleFailure('The payment failed. Please try with another payment method.');
						return;
        }

				// If the payment has any actions for the SDK to complete
				if (paymentResponse.requiredAction?.clientToken) {
					this.paymentId = paymentResponse.id;  // This will be used for resuming later
					handler.continueWithNewClientToken(paymentResponse.requiredAction.clientToken);
					return;
				}

				// Display the success screen
        handler.handleSuccess();
				return;

			} catch (error) {
				// Handle error
			}
	}
Handle onResumeSuccess() callback
Handling
onResumeSuccess() is required to fully support 3DS and the majority of payment methods.- You will receive a
resumeTokenvia theonResumeSuccess()callback if applicable - Send a resume payment request with the
resumeToken - If the payment is successful, call
handler.handleSuccess()in order to display a success screen. - If the payment is unsuccessful, call
handler.handleFailure(errorMessage)to display an error / failed message. - Payments API may again return a new
clientTokenfor additional steps. In this case, callhandler.continueWithNewClientToken(clientToken)to the checkout.
Typescript
const onResumeSuccess: async (
	  resumeToken: string,
	  handler: PrimerResumeHandler
	) => {
			// Make an API call to resume the payment.
			try {
				const resumePaymentResponse = await resumePayment(this.paymentId, resumeToken);

				// If the request failed you can cancel the flow and display an error message
        if (!resumePaymentResponse) {
            handler.handleFailure('The payment failed. Please try with another payment method.');
						return;
        }

        // The checkout will automatically perform the action required by the Workflow
        if (resumePaymentResponse.requiredAction?.clientToken) {
            handler.continueWithNewClientToken(resumePaymentResponse.requiredAction.clientToken);
						return;
        }

        // Display the success screen
        handler.handleSuccess();
				return;

			} catch (error) {
				// Handle error
			}
	}
Step 3. Generate a client token
Make an API call to your backend to generate a Client Session. The Client Session request returns a client token, which you will need to initialize the checkout.Here is an example of how it can be done from your component. Once successful, store your client token for future use.Typescript
const CheckoutScreen = (props: any) => {
	// ...

	const onUniversalCheckoutButtonTapped = async () => {
		try {
			// ...
			// Ask your backend to create a client session
			const clientToken = await createClientSession()
		} catch (err) {
			// Handle error
		}
	}
}
Step 4. Show Universal Checkout
At this point, you should have a client token available. To present Universal Checkout, callshowUniversalCheckout(clientToken) as shown below.Typescript
const CheckoutScreen = async (props: any) => {
	// ...

	const onUniversalCheckoutButtonTapped = async () => {
		// ...

		try {
			// Present Universal Checkout
			await Primer.showUniversalCheckout(clientToken)
		} catch (err) {
			// Handle error
		}
	}
}
You should now be able to see Universal Checkout, and the user can now interact with it. When the user tries to pay, we will tokenize the payment method and invoke
onTokenizeSuccess. You can then create the payment as mentioned in Step 4.Full Snippet
Typescript
import {
		Primer,
		PrimerSettings,
		PrimerCheckoutData,
		PrimerTokenizationHandler,
		PrimerResumeHandler,
		PrimerPaymentMethodTokenData
} from '@primer-io/react-native'

const CheckoutScreen = (props: any) => {

	const onTokenizeSuccess: async (
		paymentMethodTokenData: PrimerPaymentMethodTokenData,
	  handler: PrimerTokenizationHandler
	) => {
			try {
				const paymentResponse = await createPayment(paymentMethodTokenData.token);

        if (!paymentResponse) {
            handler.handleFailure('The payment failed. Please try with another payment method.');
						return;
        }

				if (paymentResponse.requiredAction?.clientToken) {
					this.paymentId = paymentResponse.id;  // This will be used for resuming later
					handler.continueWithNewClientToken(paymentResponse.requiredAction.clientToken);
					return;
				}

        handler.handleSuccess();
				return;

			} catch (error) {
				// Handle error
			}
	}

	const onResumeSuccess: async (
	  resumeToken: string,
	  handler: PrimerResumeHandler
	) => {
			try {
				const resumePaymentResponse = await resumePayment(this.paymentId, resumeToken);

        if (!resumePaymentResponse) {
            handler.handleFailure('The payment failed. Please try with another payment method.');
						return;
        }

        if (resumePaymentResponse.requiredAction?.clientToken) {
            handler.continueWithNewClientToken(resumePaymentResponse.requiredAction.clientToken);
						return;
        }

        handler.handleSuccess();
				return;

			} catch (error) {
				// Handle error
			}
	}

	const onError = (
    error: PrimerError,
    checkoutData: PrimerCheckoutData | null,
    handler: PrimerErrorHandler | undefined
  ) => {
			// Handle the error
	}

  const onUniversalCheckoutButtonTapped = async () => {
    try {
      const settings: PrimerSettings = {
        paymentHandling: "MANUAL",
        /* Other options... */
        onTokenizeSuccess,
        onResumeSuccess,
        onError
      }

      await Primer.configure(settings);

      const clientToken = await createClientSession();

      await Primer.showUniversalCheckout(clientToken)
    } catch (err) {
      // Handle error
    }
  };
}