See our Fraud Overview for more general information about how we support fraud prevention.
What is supported?
Payment methods
- Card
- Apple Pay
- Google Pay
- Klarna
- Vipps via Adyen
- iDeal via Adyen
- Blik via Adyen
- Twint via Adyen
- MobilePay via Adyen
- Venmo via Braintree
- Pix via Volt
Sift-Specific Concepts
- Decisions: Decisions represent business actions taken on an order-level or user-level. You use decisions to record what has happened. Sift uses this information to continuously improve the accuracy of your risk scores. Sift allows users to add decisions and have a lot of flexibility.
- Workflow: In addition to Primer workflows, you will need to set up order and transaction level workflow in your Sift Dashboard. We take you through the required steps below.
Instructions
Set up Sift decisions
For the integration to work with Primer add decisions similar to these: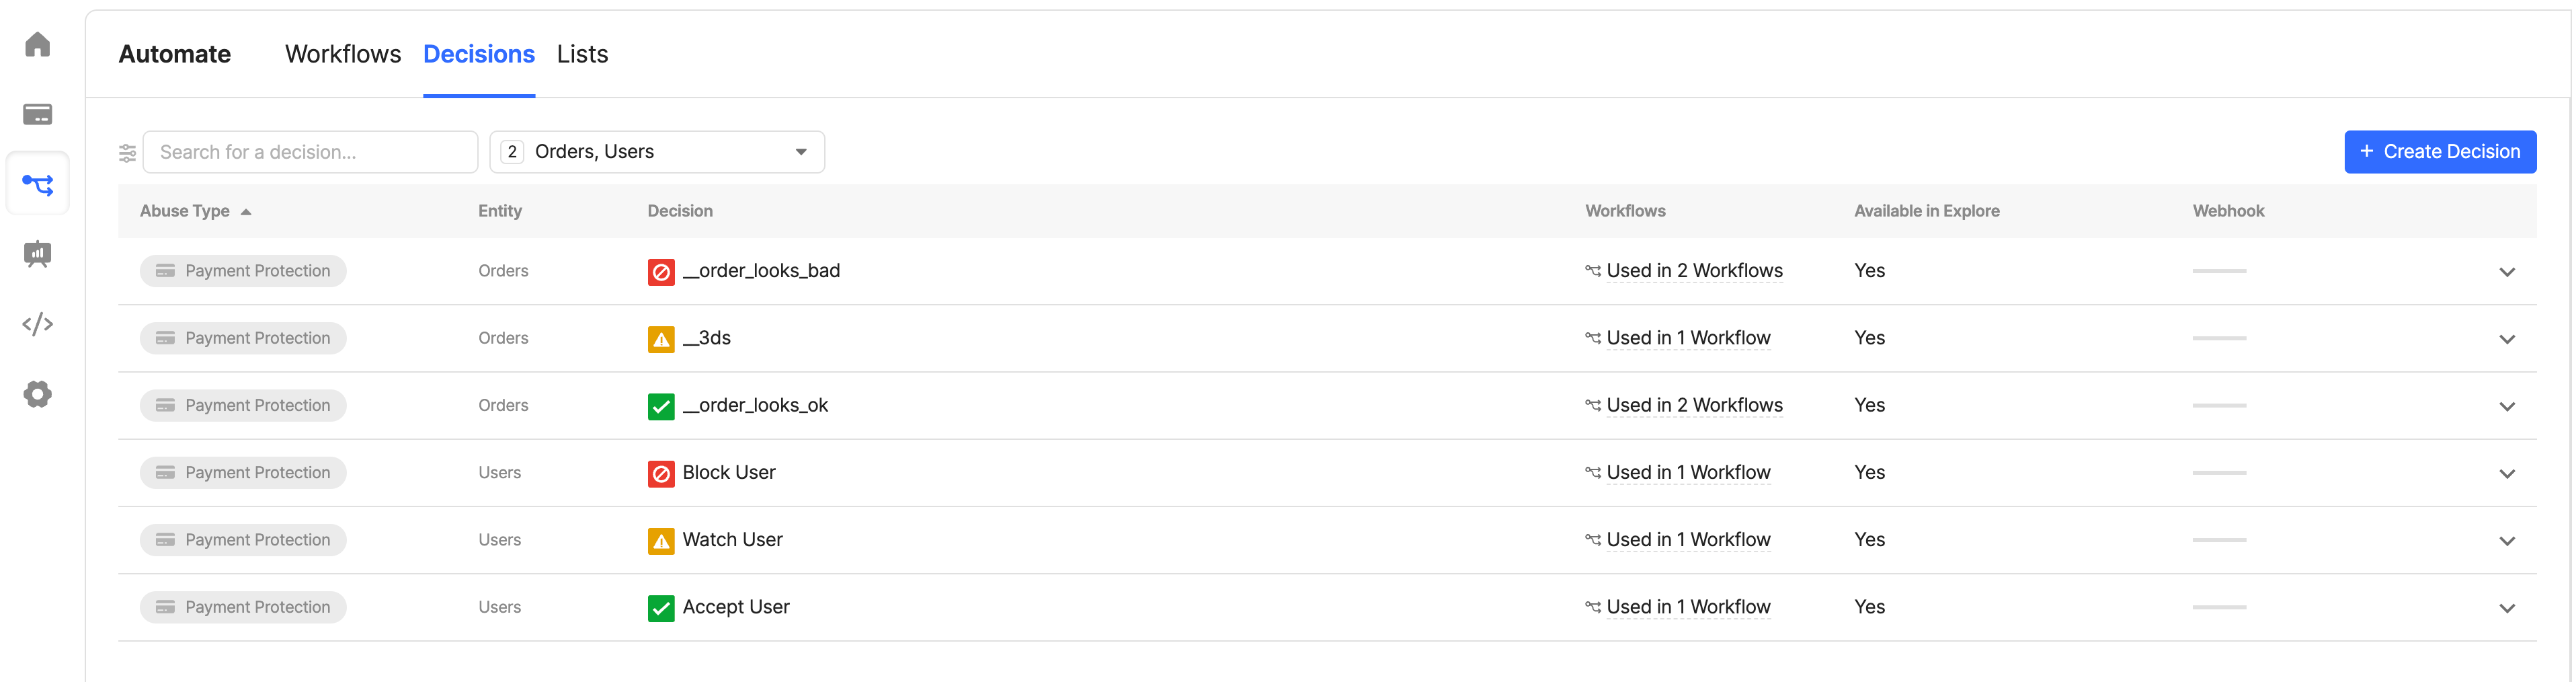
- Go to Automate > Decisions
- Create or edit your Sift decisions, for both orders and users, using the following categories:
- Category “Block”
- Category “Watch”
- Category “Accept”
- Sift will generate IDs for these decisions, take note of these IDs.
Set up a Sift integration
- Go to your Primer Dashboard.
- Navigate to the “Integrations” section, select “Add Integration” at the top of the page and search for Sift. Follow the dashboard instructions.
- For sandbox testing make sure you have enabled sandbox mode on your Sift account. Click on the account icon and toggle “Sandbox”.
- Go to your Primer dashboard, go to your Sift integration, and paste any relevant decision ID from Sift into the following fields:
Sift order 'Pass' decision IDSift order '3DS' decision IDSift order 'Reject' decision ID
Required fields
For card payments, the following fields have to be passed for Sift to accept the request.| Field | Type |
|---|---|
customerId | string |
customer.emailAddress | string |
Using Sift via the Payments app
Using the Payments app in a Primer workflow, you can optionally enable the following fraud checks:- Pre-authorization -> We trigger a
$create_orderevent on Sift - Post-authorization -> We trigger a
$transactionevent on Sift
Note that setting up fraud checks is optional. You can also set up a pre-authorization check only and omit post-authorization.
Pass3DSRejectFail
Set up pre-authorization Sift workflow
- Navigate to your Sift account dashboard
- Go to Automate > Workflows
- Set up a pre-authorization (create order) Sift workflow
- Add new Workflow
- Set Type of Workflow to: “Payment protection”
- Set Triggered on which Events to “Create order”
- Set your Sift workflow routes to use some or all of the three Sift decisions defined above
- Set to Always Run

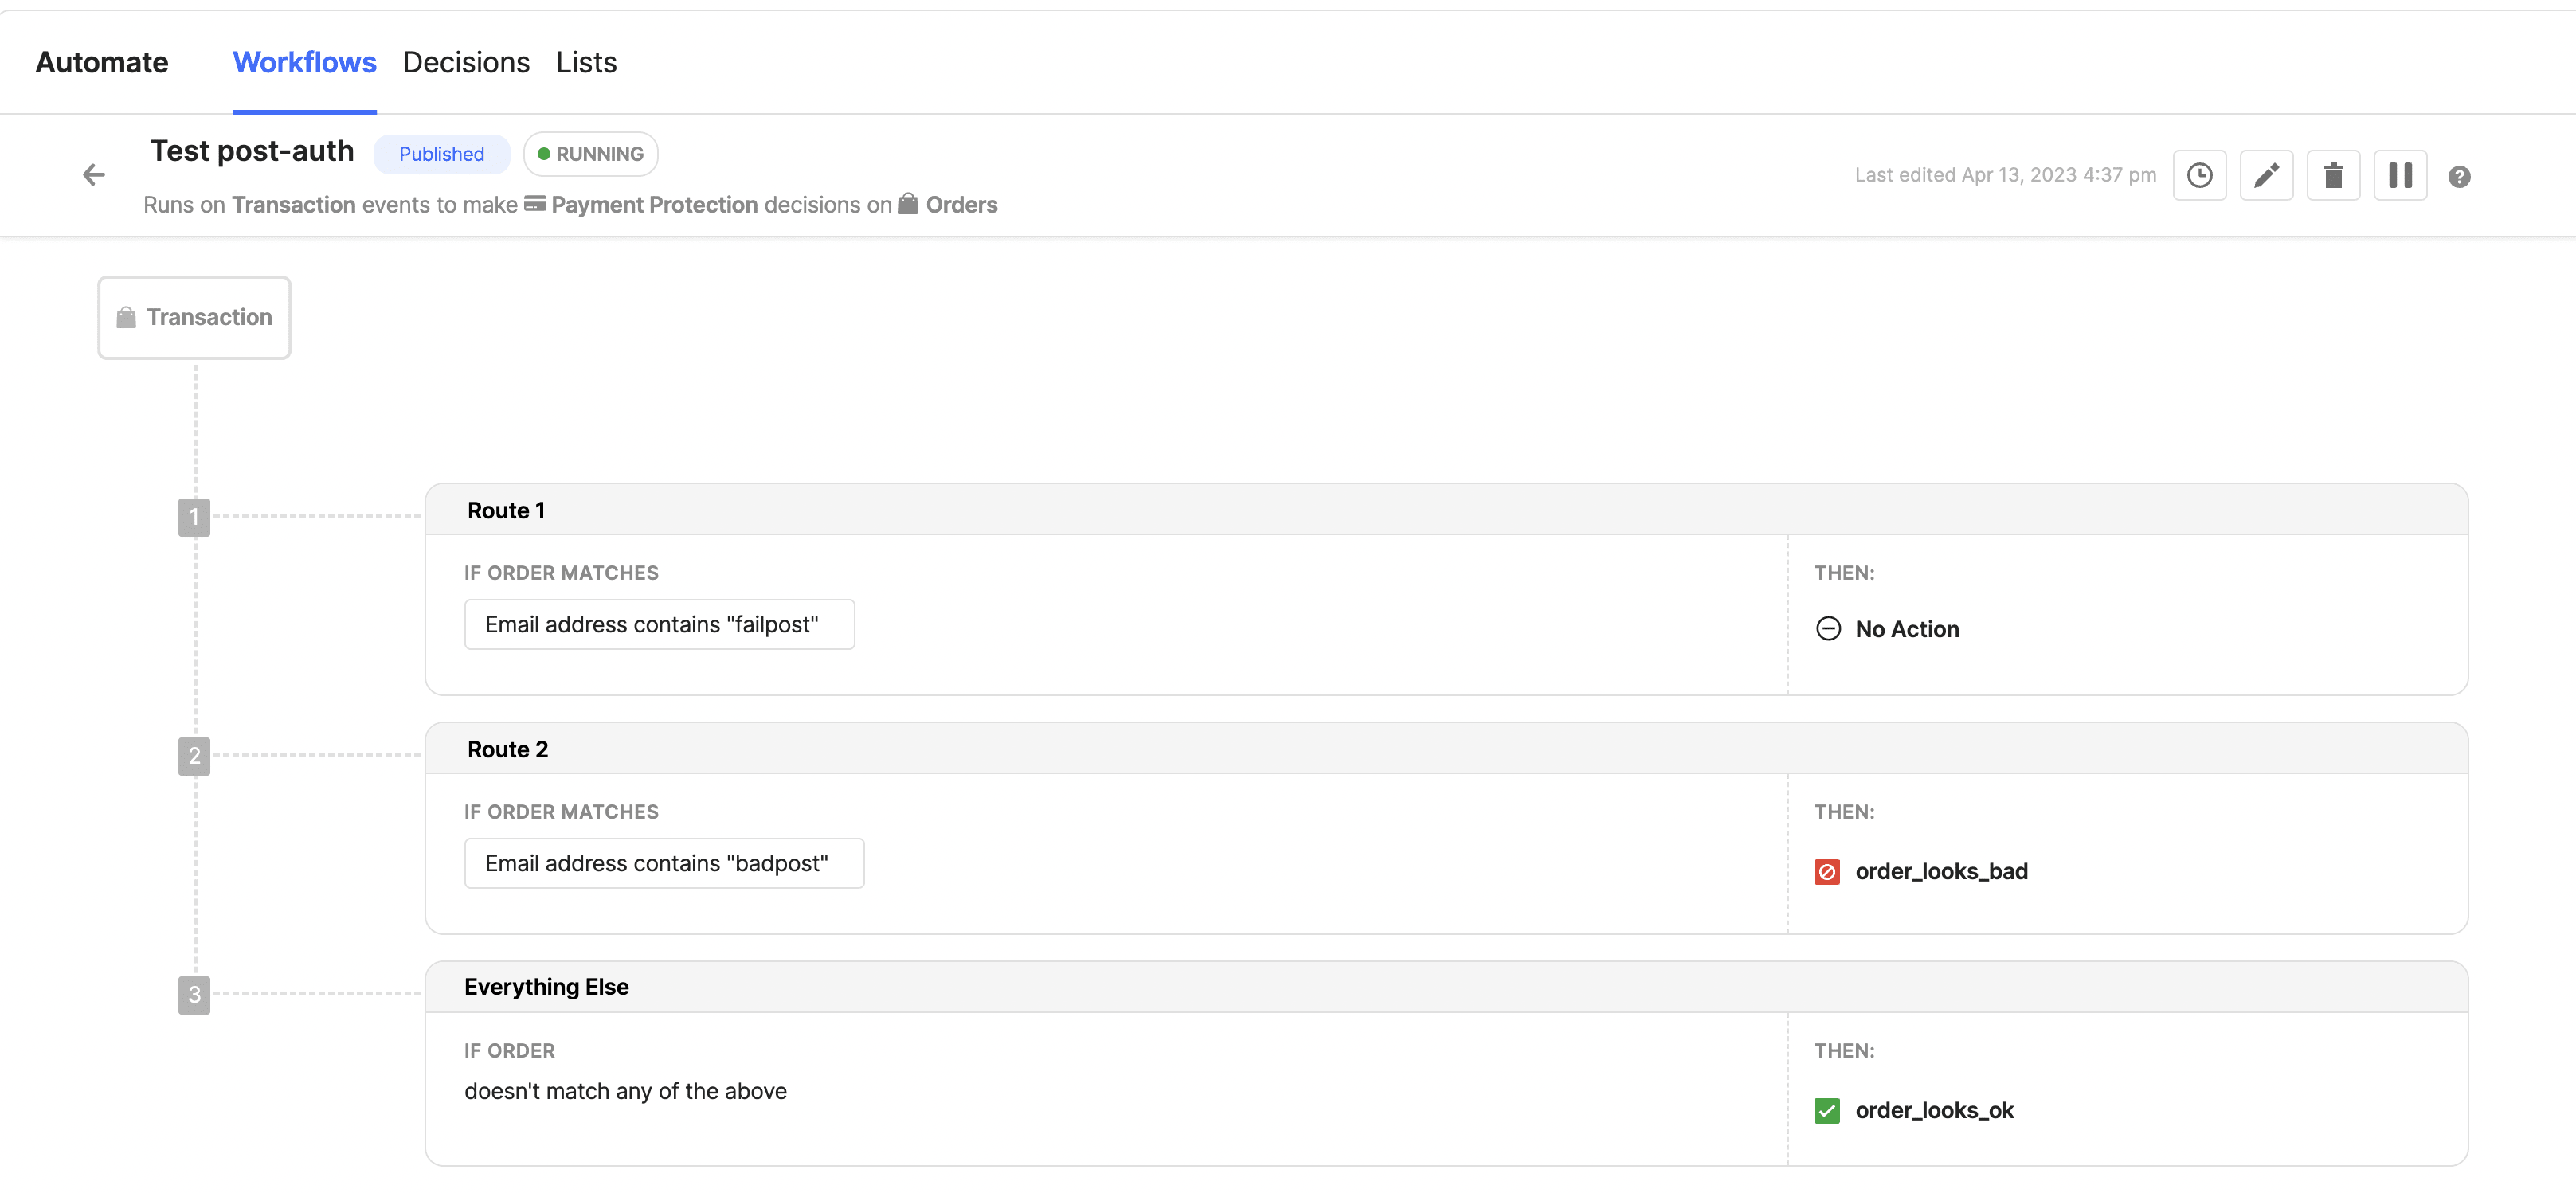
Set up post-authorization Sift workflow
- Navigate to your Sift account dashboard
- Go to Automate > Workflows
- Set-up a post-authorization Sift workflow
- Add new Workflow
- Set Type of Workflow to: “Payment protection”
- Set Triggered on which Events to “Transaction”
- Set your Sift workflow routes to use the
order_looks_okandorder_looks_badSift decisions - Set to Always Run
Testing
See our Get Started guide for an example Client Session to use for testing.
Pre-authorization fraud check
Set up your workflow with an “Authorize payment” action and a pre-auth fraud check as described above.- To trigger a
Passoutcome, setcustomer.emailAddressto start without_of_scope. - To trigger a
Rejectoutcome, setcustomer.emailAddressto start withfraud. - To trigger a
3DSoutcome, setcustomer.emailAddressto start withsca. - To trigger a
Failoutcome you will need to pass a request that is incorrect. An example of this is to set thecurrencytosomethingas this field needs to be a recognised currency code.
Post-authorization fraud check
Set up your workflow with an “Authorize payment” action and a post-auth fraud check as described above.- To trigger a
Passoutcome, setcustomer.emailAddressto equaltest@approve.com - To trigger a
Rejectoutcome, setcustomer.emailAddressto equaltest@decline.com
Using the Sift app
Primer provides a Sift app for conveniently interacting directly with Sift. The following actions are supported:- Apply decision -> Using Sift’s API we can apply decisions on specific orders or customers.
- Create account event -> We trigger a
$create_accountevent on Sift - Update account event -> We trigger a
$update_accountevent on Sift - Link a session to a user id -> We trigger a
$link_session_to_userevent on Sift
Apply user or order decision
After configuring your Sift decisions (see instructions above), you can use the Sift app to apply these decisions to a specificcustomerId or orderId.
Link session to user
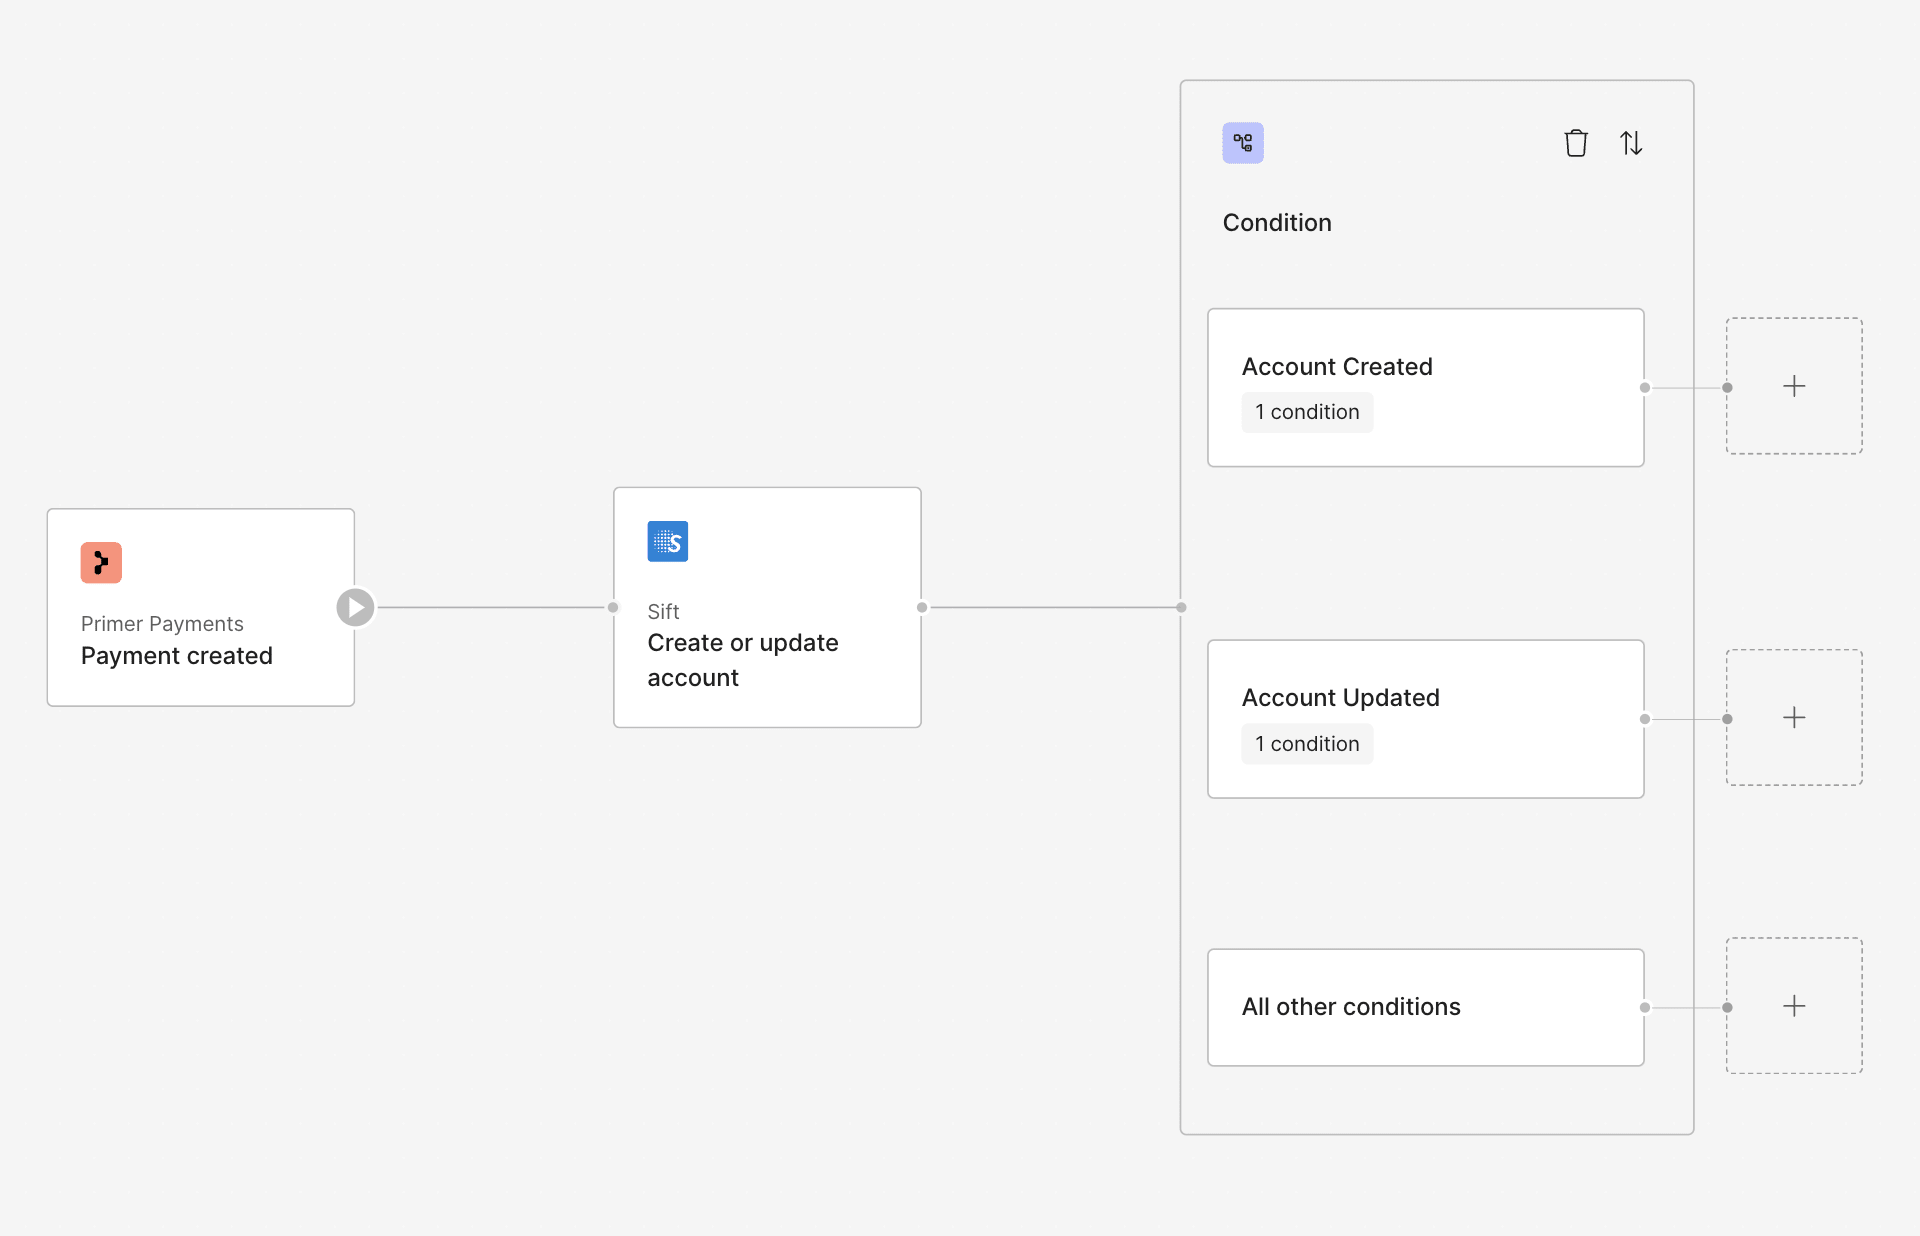
Use this action to associate data from a specific session to a user. Generally used only in anonymous checkout workflows. This action can be used in workflows either as part of a payment flow, if a session ID is also passed in, or outside. If a session needs to be linked to a user at different points in the customer journey, a custom workflow using the Primer Web Requests app can be set up.Create or update account
This serves to inform Sift of a new customer or an existing customer using a new payment method. Based on the current payment and the data provided on the client session, we determine whether to trigger a “create account” or “update account” event. The outcome of the action could be eitherACCOUNT_CREATED, ACCOUNT_UPDATED or NO_ACCOUNT_ACTION_TAKEN (if neither happened).
Below is an example of how this action could be used in a workflow
$create_account and $update_account events. If you do, then go to your Primer dashboard and to your Sift integration, and paste any relevant decision ID from Sift into the following fields:
Sift account 'Pass' decision IDSift account 'Monitor' decision IDSift account 'Reject' decision ID
Create account
- This case will be triggered if it is a brand new customer, i.e. you are using a new
customerIdwhen creating a client session. - The resulting output status will be
ACCOUNT_CREATEDand optionally would have a Siftdecision_iddepending on whether you configured a Sift workflow to trigger on a$create_accountevent.
It is recommended that you vault a customer’s payment method using the
vaultOnSuccess flag. This is to ensure if they use the same card, it won’t be seen as an “update” event.If you populate the
customer.emailAddress, customer.billingAddress or customer.shippingAddress, these values will be mapped and sent to Sift for $create_account events.Update account
- This case will be triggered in the case of a returning customer, i.e. you are using the same
customerIdwhen creating a client session, but they are using a new payment method, i.e. a new card that was not vaulted before. - The resulting output status will be
ACCOUNT_UPDATEDand optionally would have a Siftdecision_iddepending on whether you configured a Sift workflow to trigger on an$update_accountevent.
No action
- If you are referencing an existing customer using a previously vaulted card, then a new account won’t be created and neither will any be updated.
- The resulting output status will be
NO_ACCOUNT_ACTION_TAKENand naturally there will be nodecision_id.
Testing
See our Get Started guide for an example Client Session to use for testing.
Create or update account action on Sift app
→ Ensure you have a workflow set up with a “Payment created” trigger and the Sift app “Create or update account” action. We recommend having an “Authorize payment” action in the same workflow after your Sift action, to ensure the payment is authorized and the card is vaulted. See example below.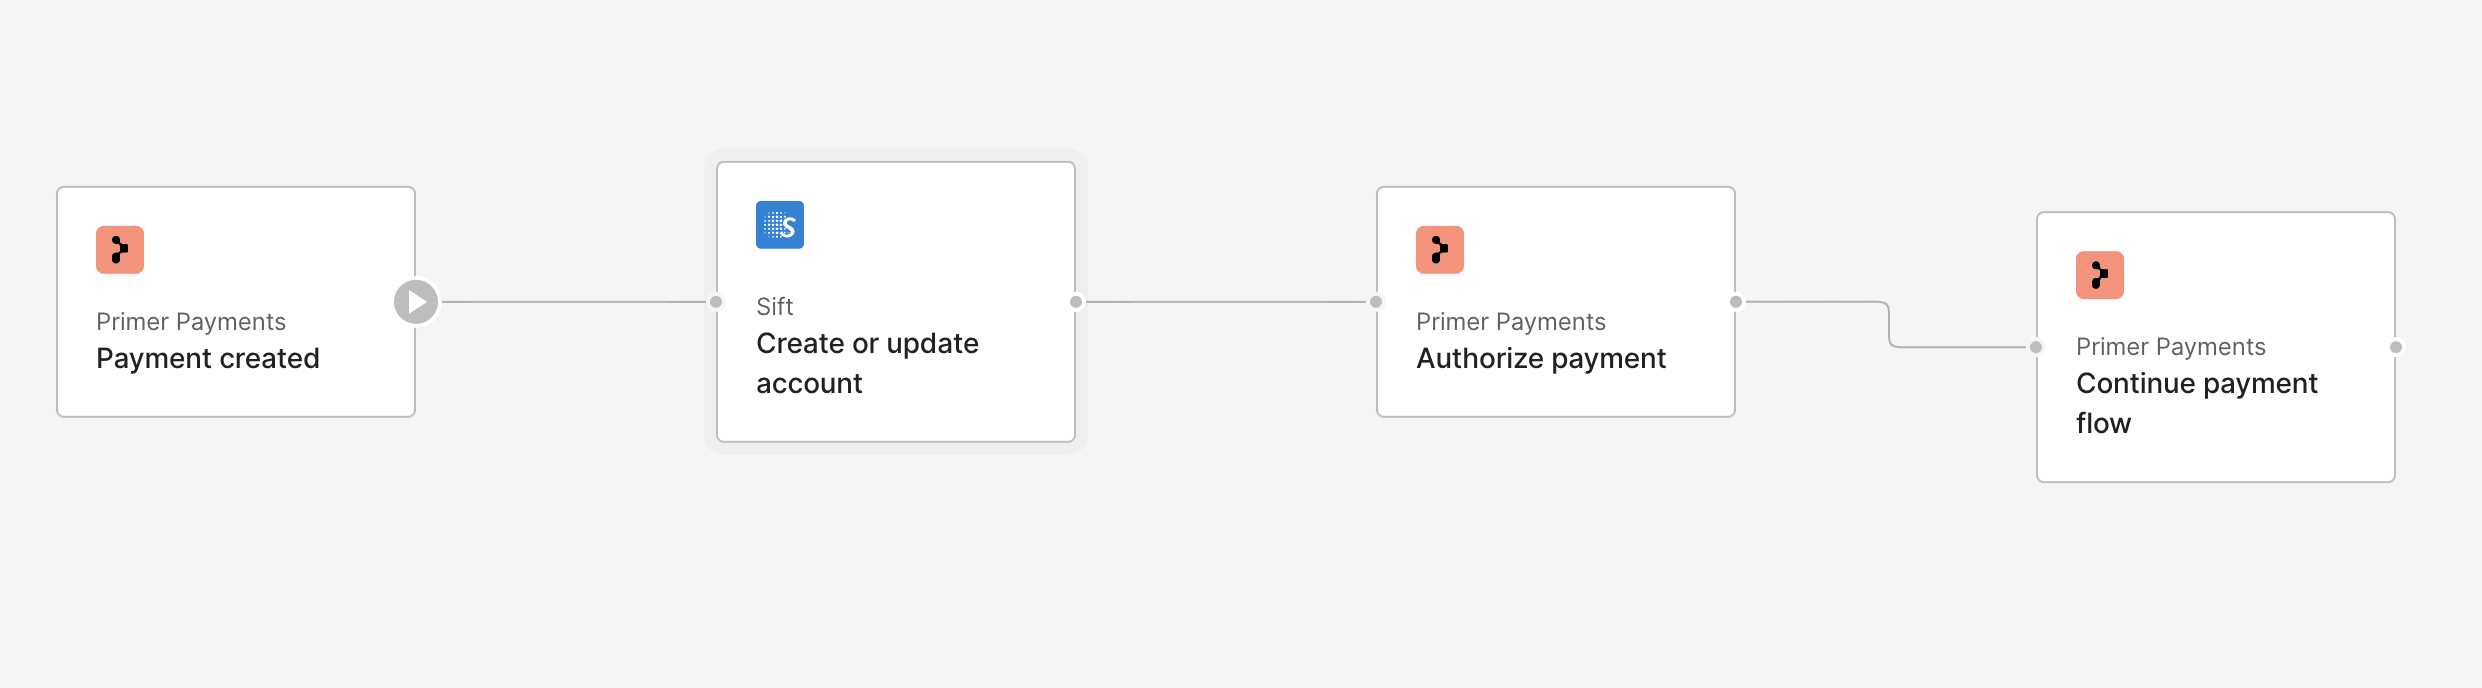
- To trigger a
ACCOUNT_CREATEDoutput on the Sift app, create a new payment using the client session mentioned above. Since you are also authorizing the payment, the card used should now be vaulted. - To trigger a
ACCOUNT_UPDATEDoutput on the Sift app, create a new payment using the client session mentioned above, however use a new test card (you can just change the expiration date and it should be considered to be “new”). - To trigger a
NO_ACCOUNT_ACTION_TAKENoutput on the Sift app, Create a new payment using the same client session above and use the same payment method that was vaulted before.
decision_id on the output of the Sift action.
Mapping
Base mapping
| Sift | Primer |
|---|---|
$api_key | API Key |
$user_id | payment.customerId |
$order_id | payment.orderId |
$user_email | payment.customer.emailAddress |
$amount | payment.amount |
$currency_code | payment.currencyCode |
$billing_address.$name | {payment.customer.billingAddress.firstName} {payment.customer.billingAddress.lastName} |
$billing_address.$address_1 | payment.customer.billingAddress.addressLine1 |
$billing_address.$address_2 | payment.customer.billingAddress.addressLine2 |
$billing_address.$city | payment.customer.billingAddress.city |
$billing_address.$region | payment.customer.billingAddress.state |
$billing_address.$country | payment.customer.billingAddress.countryCode |
$billing_address.$zipcode | payment.customer.billingAddress.postalCode |
$shipping_address.$name | {payment.customer.shippingAddress.firstName} {payment.customer.shippingAddress.lastName} |
$shipping_address.$address_1 | payment.customer.shippingAddress.addressLine1 |
$shipping_address.$address_2 | payment.customer.shippingAddress.addressLine2 |
$shipping_address.$city | payment.customer.shippingAddress.city |
$shipping_address.$region | payment.customer.shippingAddress.state |
$shipping_address.$country | payment.customer.shippingAddress.countryCode |
$shipping_address.$zipcode | payment.customer.shippingAddress.postalCode |
$items[].$item_id | payment.order.lineItems[].itemId |
$items[].$product_title | payment.order.lineItems[].name |
$items[].$price | payment.order.lineItems[].amount |
$items[].$currency_code | payment.currencyCode |
$items[].$quantity | payment.order.lineItems[].quantity |
$items[].$sku | payment.order.lineItems[].productData.sku |
$items[].$brand | payment.order.lineItems[].productData.brand |
$items[].$color | payment.order.lineItems[].productData.color |
$browser.$user_agent | payment.metadata.fraud_context.device_details.user_agent |
$browser.$accept_language | payment.metadata.fraud_context.device_details.accept_language |
$merchant_profile.$merchant_id | payment.metadata.fraud_context.merchant_details.merchant_provider_id |
$merchant_profile.$merchant_category_code | payment.metadata.fraud_context.merchant_details.merchant_category_code |
$merchant_profile.$merchant_name | payment.metadata.fraud_context.merchant_details.merchant_name |
$session_id | payment.metadata.fraud_context.device_details.cookie_token |
$ip | payment.metadata.fraud_context.device_details.browser_ip |
Post-authorization mapping
| Sift | Primer |
|---|---|
$type | $transaction |
$transaction_type | $capture |
$transaction_status | Mapped from the payment status |
$transaction_id | ID of the first transaction |
Card, Apple Pay & Google Pay
| Sift | Primer |
|---|---|
$payment_methods[0].$payment_type | $credit_card |
$payment_methods[0].$card_bin | Card first 6 digits |
$payment_methods[0].$card_last4 | Card last 4 digits |
$payment_methods[0].$avs_result_code | AVS result code |
$payment_methods[0].$cvv_result_code | CVV result code |
PayPal
This mapping only applies to PayPal Order payments.
| Sift | Primer |
|---|---|
$payment_methods[0].$payment_type | $third_party_processor |
$payment_methods[0].$payment_gateway | $paypal |
$payment_methods[0].$paypal_payer_id | PayPal Payer ID |
$payment_methods[0].$paypal_payer_email | PayPal email address |
$payment_methods[0].$paypal_payer_status | PayPal status |
Other payment methods
| Sift | Primer |
|---|---|
$payment_methods[0].$payment_type | Depends on the payment method |
$payment_methods[0].$payment_gateway | Depends on the payment method |
Custom field mapping
Advanced Metadata Mapper is supported via Sift. You can map Sift’s Complex Field Types, such as booking-type objects specific to your industry, directly from the integrations dashboard. Please note you will not be able to override fields that have already been mapped by Primer such aspayment_method,
browser and merchant_profile.