What are fallbacks?
A fallback is a payment recovery service that is used when the primary processor fails and the payment is routed to a backup processor.
There are scenarios where a payment may fail or decline with one processor but be authorized with another, such as when the first processor has technical issues. By setting up fallbacks to route the payment to a second processor under certain conditions, you increase the chance of a successful payment.
How to set up fallbacks
Setting up fallbacks is very simple with Primer:
- 1Create a workflow with the Payment created Trigger. Learn more about this Trigger here.
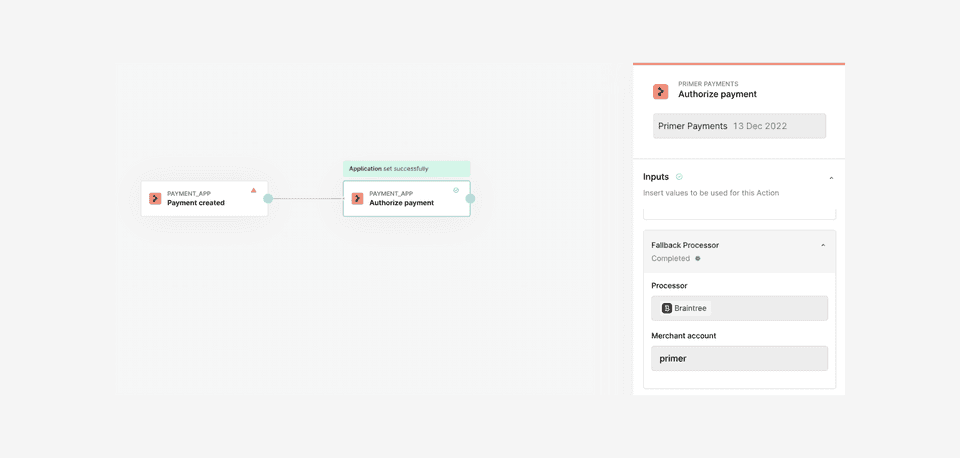
- 2Add the "Authorize payment" Action to your workflow. In the configuration panel, you will see the option to select a fallback processor.
- 3Select your fallback processor from one of your existing connected processors and assign a merchant account.

Once set up, when this workflow is triggered and it processes a payment, the fallback service will be utilized during authorization.
Fallbacks with 3DS
Fallbacks can be configured with the following 3DS settings within the "Authorize payment" Action of the Payments App:
- Primer 3DS
- Adaptive 3DS
During checkout, your customer will complete the 3DS authentication and this data will be included in the first authorization request. When the second authorization request is sent to the fallback processor, the 3DS data is included so the customer won't have to complete the 3DS flow twice.
Fallbacks are not compatible with Processor 3DS. This is because the processor handles the 3D Secure authentication flow and Primer is not involved in the flow.
When are fallbacks triggered?
Primer standardizes decline codes and reasons from processors so you only need to rationalize about payments once.
Payments have the following fields which have been standardized across all processors:
statuserror decision typeerror decline typeerror decline reason
Falllbacks will be triggered when the payment has one of the following sets of field values:
| Status | Error Decision Type | Error Decline Type | Error Decline Reason |
|---|---|---|---|
| Declined | Gateway Rejected | N/A | N/A |
| Declined | Issuer Declined | Soft Decline | Declined |
| Declined | Issuer Declined | Soft Decline | Refer to Card Issuer |
| Declined | Issuer Declined | Soft Decline | Issuer Temporarily Unavailable |
| Declined | Issuer Declined | Soft Decline | Do Not Honor |
| Failed | Application Error | N/A | N/A |
Fallbacks and Adaptive 3DS have overlapping triggers. If both features are activated for a payment, Adaptive 3DS always has priority. If the second authorization attempt still fails, a fallback may be triggered.
See your fallback payments
There are two ways to see your fallback payments:
Payments timeline
Easy-to-use UI to browse and review the details of your fallback payments.
Payments API
Retrieve details of your payments programmatically via API.
Payments timeline
You can see all your Primer payments from the Payments timeline in the Primer Dashboard.
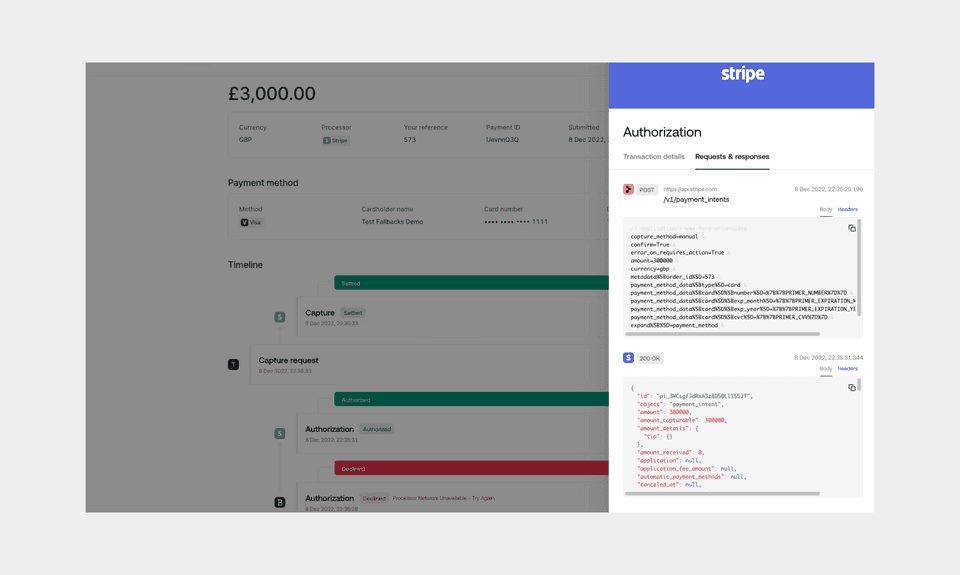
Navigate to the specific payment detailed timeline page. You will see the fallback details, where the first processor was unsuccessful and the fallback was triggered sending a second authorization request to your fallback processor.
Primer is not a black box, but rather your payments infrastructure. By selecting a specific event, you can see the requests and responses, providing full transparency into everything that’s happened to your payment throughout its journey.

Merchants will soon be able to filter for all fallback payments in the Payments list view.
See your fallback payments via the Payments API
For a programmatic solution, either:
- retrieve a single payment using the Primer payment ID - see the API reference for more.
- search and retrieve a list of payments - see the API reference and specific guide for more.