A step by step demo of creating workflows surrounding a specific use case: Identity verification. For detailed explanation of the various concepts used, follow the "Create a workflow" guide.
Use case requirements
- Every time a user has made a payment with a new payment method, send them a verification link via email.
- Capture the payment when the user is approved, and cancel if not.
- Notify the team on Slack for specific verification outcomes, like "fraud suspected", or "well known fraudster".
For the sake of this demo, the following apps will be used to implement this use case:
- Payments
- Onfido for KYC
- Mandrill to send an email
- Slack to post a message
App setup
Apps can be connected to right from within the workflow canvas, but also through the "Apps" section in the dashboard. When creating a new workflow you always have access to all apps, no matter if you have already connected them or not.
Creating the workflows
Workflows can be created at a very granular level when using the various Automation concepts, especially around Triggers and Trigger Conditions.
Accepting payments
The first workflow can be as simple or as complex as your payment orchestration needs are. For this use case the payment will only be captured or cancelled depending on the verification result, so the workflow will end with the authorization attempt.

Sending the verification link
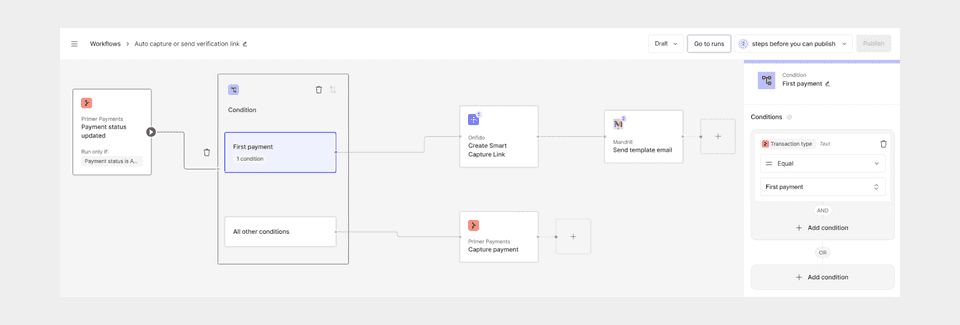
Given the requirement of only sending the link to payments with the type "first payment" (see: vaulting), the "Payment status updated" trigger can be used to react to the previous authorization attempt.

Therefore, this workflow is set up like this:
- Trigger: Payment status updated from the Payments app
- Trigger Condition: Payment status =
AUTHORIZED - Utility: Conditions
- Branches: Transaction type =
FIRST_PAYMENT
This means any payment using an existing payment method can be captured automatically if the authorization attempt was successful, but FIRST_PAYMENT will be handled differently.
Next, create the verification link using Onfido's "Create Smart Capture Link" action.
Do note that for some apps to properly work, they also have to be configured within the third-party. In the case of Onfido, the verification process is set up to take a payment ID in and return that payment ID via the result webhook, so that the verification can be tied back to the correct payment.
With the link created, an email can be sent to the customer. There are different services and ways to send email, either as plain text, as HTML, or using the templates created within the third-party (like Mandrill, Sendgrid, Postmark). To avoid having to create fully styled emails from within the workflow, it's recommended to use these templates and only pass the required variables through.
Capture/Cancel based on the verification result
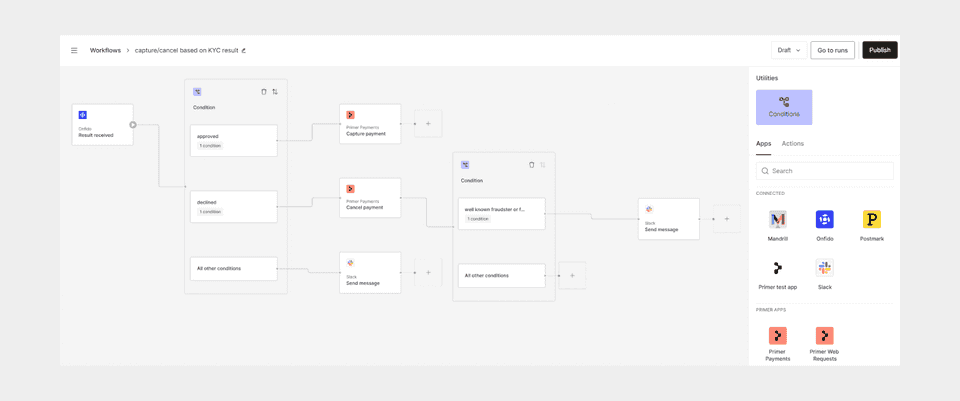
The "Result received" trigger from Onfido can now be used to handle the various states they support. For this demo use case only "approved" and "declined" will be used.

- Trigger: Result received from the Onfido app
- Utility: Conditions
- Branches: Status =
approved - Branches: Status =
declined
Depending on the status, the payment can now be captured or cancelled.
Onfido also supports custom reasons to be returned, so an additional condition utility can be added to alert on Slack for certain cases:
- Utility: Conditions added after "Cancel payment"
- Branch: Reason one of (
well known fraudster,fraud suspected)
Then a Slack message can be sent letting the team know to review closely.
Additional ideas
Automation can be used to build even more logic and take the use case further:
- Add conditional logic to send an SMS instead of an email for users who provided their phone number.
- Automatically update a CRM and tag a user if the result indicates fraudulent activity.
- Add a counter to be passed through and allow users more than one attempt to get verified.
- Handle the "abandoned" outcome from Onfido to create a new link and send a reminder to the user.
See it in action
Here is a video walking through this exact setup and how the workflows were created:
Start automating
You now know how to get the most out of Workflows, but there's more that you can do:
- Learn about the Payments App
- Check our guide to monitor workflows
- Learn more about Workflows best practices